It’s time to get outside and enjoy the warm weather! Just because you’ve got your indoors in check doesn’t mean that you should ignore the state of your yard. However, working in the yard seems like a job you should leave to the professionals because if you screw up, the whole neighborhood will see. Hopefully, these simple ideas will help you to develop a green thumb and spark your creativity. That way, you won’t be so intimated to cultivate your yard into the relaxing paradise everyone will adore.
Letting your cat enjoy the outdoors will help enrich their minds, but there’s always the risk of them getting injured or killing birds. Provide them with the means to get some exercise and mental stimulation with some easy shelving and some chicken wire. Your cat will love it. Building a cat walkway is an easy summer project that will most certainly transform your yard while creating entertainment for you and your furry, feline friends.
It only takes a few store-bought materials to create a bright, airy walkway for your cats to enjoy some time outside. A trip to the lumber store will ensure you obtain all the materials you need to see this project through. Some lumber, wire mesh fencing, and some heavy duty staples are all you need to create a space that you and your cat can enjoy in your backyard. This project is very creative and adaptable because it completely depends on your yard’s size, the space you have to work with and how much room you want to give your cats to play around with and enjoy.
If you are looking for a way to create or just expand the entertainment space in your yard, look no further than your local hardware store. When trying to buy outdoor chairs and seating arrangements to satisfy the area you are looking to fill, it can result in spending much money. Instead, stack the cinder blocks, cement them together, and add some superb padding and cushions. In no time, you’ve created a fantastic bench that can withstand the weather and doesn’t take up any extra space in your hard. Building a cinder block bench is a great, budget-friendly, although admittedly heavy, project that can easily transform your yard.
This project can provide additional seating in your yard or carve out space for a much-needed place to entertain guests and just relax in your own quiet space. There are several ways you can design your cinder block bench, it can be done by using only cinder blocks stacked on top of each other, or it can be accented and supported by some type of lumber, such as a treated 4 x 4. A great way to get inspiration and guidance on the most ideal way to build a cinder block bench can easily be found by spending a few minutes on the internet.
What’s a great way to keep the kids busy outside for hours? Chalk! However, instead of getting their hands and knees dirty, let them stand up and put their masterpieces on display. A simple bucket of chalkboard paint and wood will do the trick. You can even use the chalkboard for adult outdoor games and evenings of grownup fun, too. It is a project that will quickly transform your yard into a fun, interactive place for you and your family and friends to enjoy all summer. A quick trip to the hardware store for a few supplies will have you completing this project in no time. Creating an outdoor chalkboard is a fun and creative way to transform your yard for kids and adults alike to enjoy.
You can mount and frame the chalkboard in your yard or on the side of a garage. Try even creating a chalkboard that can just lean on something else. It will give you the freedom to move it around as you want; you can create a space that encourages people to interact with each other. Chalkboard paint can quickly transform a piece of wood into a fun way to engage your kids and guests while entertaining. A couple of coats of this paint and a handful of colored chalk are all you need to take your entertaining skills to the next level. Chalk is a fun material to use because it can easily be erased, and you will have fun creating and drawing with your family all summer long.
Have you ever thought about trying to create a little farmstead in your backyard? Did you know they can take care of the bugs in your yard as well as fertilize your grass? Chickens are relatively low maintenance animals to begin supplying your own food. Just think of the money you will save on eggs! However, you will have to make sure the chickens are safe from weather elements and predators. Many tutorials can be found online to help you make an easy-to-build chicken coop that’s functional as well as stylish. When starting this project, you will want to consider the placement of the coop in your yard. They can be a bit messy with their droppings, so a corner in the yard, somewhere a little more out of the way of your regular entertaining space, is an ideal space to create this project.
Chickens need to have a warm space available to them and stalls for each chicken to lay their eggs in. A grow/heat light can also be utilized to help chickens stay on a regular schedule for producing/laying eggs. In addition to the enclosed space, a more open air space is needed for their food and water and to allow them to roam about a bit more. Chicken wire can be stapled to a lumber frame to create a safe space for your chickens to hang out. Additionally, chickens like to roost, so some structure is needed to get up off the ground. Old tree limbs can work, as well as building some type of frame they can sit upon. Once you have this completed, you can settle your flock in and enjoy eggs from your yard before you know it!
If you are an avid wine drinker, save those empty bottles and reuse them! It is a fun summer project that can easily transform your backyard in no time at all. Wine bottles come in many different shapes and sizes, so this is a great way to add visual interest to your entertaining space as well as light and ambiance. These tiki bottles can be placed around your backyard space, on your dining table, or end tables or be used to create and light up a walkway in your yard, and will help you light up the night while entertaining your guests. All you need to do for this project is add some citronella oil to the bottle and a wick, and you have an excellent tiki torch.
Not only will they light up the night sky with a tropical flair, but tiki torches will keep the mosquitoes away during your barbecue too. The bottles can be placed around your dining space to create a kind of barrier to effectively let you eat and entertain in peace, without those biting nuisances all night. A couple of things to remember with this project is not to fill the bottles too high with citronella fluid. In case they were to be tipped or spilled, you will have much less mess to deal with if there is not as much fluid to spill. Furthermore, be careful not to make the wicks too long so that you don’t have huge flames. You want to just let about a half to one inch of wick out of the top. These torches are meant to light up your space.
Many people are eager to welcome after a long winter, and planting seeds are a great way to get started. There are many tips and tricks out there regarding planting seeds, but a beautiful design and placement can be tricky to achieve without the right tools. If you want your yard to look extraordinary, it can be hard to get your arrangements spaced out properly. This simple project will effortlessly transform your garden space into a plant-producing work of art. Creating a planting, too, such as this one, will help you ensure uniformity and organization in your garden.
For this project, all you will need is a piece of board and a handful of corks to attach to it. The board can be almost any size, but be careful not to go too big. You want to have control over the board as you press it into the soil, ensuring uniform spacing and seed depth. Once you have attached the corks to the board with something like hot glue, or another suitable adhesive, you then can just press the whole thing into your soft garden soil. Now you have evenly spaced holes for your seed!
Spruce up your backyard with a little stone paving. Creating this look isn’t that hard to do; honestly, you’ll spend more time thinking of a shape and drawing it on paper than actually putting it together. Keep in mind that this summer outdoor project will eat up your entire weekend, so plan accordingly. While this may take some more time to complete than other projects, it is one that can be enjoyed for many summers to come. In the beginning, a little planning will ensure you can easily carry out this project on the weekend and help avoid any settling or sinking issues that can sometimes occur. Like many projects, tutorials can be found online to help you carry out the proper steps to make this a long-lasting project in your yard.
If you are going across the grass, you will need to cut the sod out by the roots, then through a series of steps, using sand and a tamper, you will create a flat, packed down area in the desired shape of your walkway. After this is completed, you can not begin laying your block! Again, utilize the internet as a resource for this. You want to make sure you keep your blocks level and pressed nice and tight against each other. It will help avoid any issues with uneven spots as the block settle. Although this project requires some elbow grease, it will be well worth the effort when you have transformed your backyard space!
How many of us remember with fondness swinging in the backyard as a child? It’s a classic pastime for children and even adults to enjoy in the summer. You can add a touch of nostalgia and whimsical fun into your yard with this simple project. If you have the space or more than one tree, a couple of these swings in your backyard will transform your space into a fun place for you and your family to enjoy. You may even be able to make this fun and simple project with things you already have in your garage!
You need some good rope, a round disc of pine, a carabiner, and a sturdy tree limb. Safety is at the top of the list with this project, so begin by making sure the rope you are using is not frayed or damaged in any way and being thick and sturdy enough to hold the weight of those who will be using the rope swing. Also, be sure to choose a wood round and wide enough to support the person swinging, and make sure the limb you are attaching it to is sturdy enough to hold weight.
This summer project is a great way to upcycle products in your home that you may have been planning to throw out anyway. For example, having those awful globe lights in your house can make it look dated. If you have done or are planning on remodeling in your home, instead of throwing those lights away, repurpose them into beautiful bird feeders. They can easily be painted or redecorated and hung in the backyard to transform your space with eye-catching feeders that will help invite some feathered friends to your yard. It is an easy afternoon project that will take almost no time at all.
There is little effort required for this project, especially if you are using the lights as is. However, if you decide to redecorate them, allow ample time for the paint to dry before moving onto the next step. You will need to ensure the new feeders can hang safely, so be sure to use secure rope or even wire to hang them. Next, add some birdseed, and depending on the type of birds you want to attract, you can add thistle, songbird seed, or sunflower seeds. This project will have you enjoying the flocks of colorful birds in your yard in no time.
This fun and simple summer project is one that the kids can get in on too! If you have children, you probably already have these materials lying around the house. Colorful marbles will add a special sparkle and light to your backyard area when the sun sets each night. This project is one that the whole family can enjoy. In addition to marbles, you only need a drill and a small size drill bit, so grab your kids and have them help you gather up some colorful marbles or even gemstones and head out to the backyard fence!
This easy project is a way to add some sparkle to your fence with just marbles. All you need to do is randomly choose spots to drill tiny circles and place the marbles in the holes. You could create some fun design with this or just allow your children to call the shots and tell you where to drill the holes. I am sure they would love it! These sparkling marbles will add a great pop of color to the decor of your yard with little or no cost to you. Even in the rain, the shiny glass glistens!
Another great project to involve your children and family in is making an outdoor xylophone. This project also requires few materials and can help you spend some quality time with your children along the way. The large blocks of wood and various bright colors will give your yard a fun, eclectic look this summer. Several online resources can provide you detailed plans for creating this project, but the basic supplies are various sized pieces of wood or metal, rope, and a frame to attach all the details. Depending on how much time you want to spend on this, you could use wood or metal to create the various “musical” tones for your backyard instrument.
Your children can have some fun with this, too, by helping you pick out the paint colors and even painting along with you. After your painted parts have dried, you just need to assemble them in descending order from longest to shortest. Then, get a nice “hammer” for your kids to hit each “note” with, and you have created hours of entertainment as well as added a creative piece of art for your backyard space. This project can even be a lesson in colors if you have small kids. Either way, this unique summer project will make your yard look fabulous.
No one ever said that your garden had to be in the ground. A pallet can serve as the space you need for your small garden, which can be tucked away or mounted on castors to become mobile if you are short on space and have a tiny yard. The pallet is a versatile item for many projects, and this is one that you can have some fun with, too. You can play around with paint or stain colors and even use chalkboard paint to create fun plant labels to customize your pallet garden even more.
After finding a suitable pallet to use, you will want to decide how many spaces you want to make for your plants and herbs, and then use additional lumber to create small pockets to hold your soil and plants. Make sure the wood is thoroughly dry before adding it to the bottom and putting in your plants. Then you can paint or stain the pallet to fit in with your current yard decor or even make a statement using bold, bright colors. This project can become a work of art and a way to produce food all summer long.
Your mailbox post sees a lot of wear and tear from the elements. It often is the last thing to get updated in your yard, if at all. Show your front yard some love and give your mailbox an updated look with a cast stone post that slides right over your old one. These posts fit precisely over your existing one, so there is little to no work involved here. However, this is one project that will easily transform your yard, giving it a fresh, updated look. There are many styles and options available, and you can probably get close to matching the colors or accents that you have on your house.
After installing your updated mailbox post, you can now add some new numbers, of which there are many options to choose from as well. If your mailbox is right on the curb of the street, a great way to quickly identify your house at night is to add a reflector to your post. A finishing touch on this project is to plant a flower bed around your newly updated mailbox, and voila! An easy and relatively simple task that at least the person who delivers your mail will notice!
If you want an excellent way for your guests to spot your house number from the road, this is it. This summer project is a great way to add a little customized detail to the front of your house. All you need is some galvanized steel buckets, paint, and stencils if you want, and you can create an eye-catching way to display your house numbers. This project could be done on any size bucket you choose, as you can place them along the steps of your front porch or use bigger containers that can sit right in the flower bed in front of your home.
After you have stenciled or hand-painted your house number design on the containers, you can now have some fun planting them up! Just add some soil and easy-to-care-for plants inside, and you have an attractive way to display your house number. Depending on your containers’ size, you can easily switch the plants out when the seasons change, too! You can plant mums in the fall and even do a pretty evergreen display through the winter. These painted house number buckets are a great way to add color and style, which easily transforms your front yard’s look.
If you have young children, you are quite familiar with the on-going struggle to keep toys and other belongings organized. This project is a great way to help contain the clutter and stay organized in your backyard space. Nothing is more frustrating than tripping over balls and toys outside on your lawn. This project can help the whole family stay on top of clean-up around the yard. Use an indoor/outdoor storage shelf unit that can be loaded up with tubs or totes and then labeled, so everyone knows exactly where things go. These containers can hold everything from basketballs and soccer balls to pool toys and even dog toys!
Keep everything even more organized with labels on the containers so that your kids know where to put everything back. Whether they do it or not is another story! But to help encourage clean-up with children, they can each have a tote with their name on it. It will still look great and be a way to motivate kids to help out more with taking care of their own belongings. Labels can be handwritten or even designed and printed out from the computer, doing this project as lovely to look at as it is to utilize!
Dressing up your walkway can be as easy as hunting through your garbage. Hey, what’s one man’s trash is another man’s treasure, right? Anyway, this easy DIY outdoor summer project can light up your back deck. This project is a great way to transform your outdoor space and add a little light to it as well. Upcycling is a great way to get another use out of items you might already have lying around the house or garage. You could make these lanterns all look the same or have some fun and design each one a little differently to customize your space.
For this project, you will need tuna cans or a similar can in size and shape, paint rods, or something to act as the pole for your lantern, hurricane glasses, copper adapters, and candles. There is much room for creativity here. You are creating a stake style lantern, so any materials similar to this list can probably be utilized to make a fun and unique way to create outdoor lighting. After assembling the whole thing, you can then spray it down and with some metallic paint or whatever you wish to accent your current yard decor for a more sophisticated finish.
This project might be one of the quickest on the list, but it is sure to transform the look of your yard and entertaining space instantly! By putting up drop curtains, you can easily add more style, color, and function to your patio. These curtains are straightforward to make, to the point that they don’t require any sewing whatsoever, but if you would like to use something you already have around the house or buy some from the store, that would work just as well, too. By hanging these curtains, you can now get out of the hot evening sun if needed, also.
All you need for this project is a tension rod, the curtains of your choice, and a way to hold them back in place. Rope, ribbon, or another kind of fabric should do just fine here. Just make sure you have enough to go around the curtain and secure it in place. If you are using fabric that isn’t specifically a curtain, you can easily create holes and add grommets to the top of the material to allow you to hang them from the rod. They’ll add a lot of color and comfort to your outdoor scene and make your summer that much more relaxing.
Bring out your true rustic talents and create some deck lights by upcycling mason jars into a unique way to light up your patio. This project’s materials can be sourced from a yard or garage sale, buying them at the store, or chances are in your own home! Any size jar could be used. You will just need to ensure the bulbs on the light string you choose will fit inside the jar. A medium-size jar would probably be ideal here, but it could also be fun to use different size jars to create a unique light display.
This straightforward project is pretty easy to do and will light up the night long after the sun has gone down. Many options are available as far as the string of lights you want to use. Some strands can be hung along the side of your deck or gazebo, and other strands can be hung more in a cluster style. Either way, you could create more than one of these canning jar lights to illuminate several areas of your yard. Mason jars come in a variety of colors now, so that could be a fun way to customize this project further, too.
This project is one that the whole family could get involved with. If you have small children, one way to help encourage good eating habits is by having them participate in the entire process of planting, caring for, and harvesting the food they eat. Furthermore, if you want to grow a few small things in your yard, why not build an elevated garden? Many vegetables, fruits, and even herbs can be grown in this elevated garden that will also transform your yard’s look. This project is great if you are short on yard space to plant a garden, too!
This outdoor project also saves you from having to bend over all the time while you’re weeding and tending to your garden, and you can change out what you plant in each season. It is a project that can get the whole family excited about eating. Everyone could pick out their favorite plants or herbs they want to grow and help take care of all season. There are many options for this type of garden, and a variety of herbs would be great, too! An elevated garden can also sit right on your patio, no need to have a large yard space to be able to enjoy the “fruits of your labor!”
If you have a covered deck or another structure with a roof/overhang, this is a very romantic way to add some soft lighting. A hula hoop, some fabric, and icicle lights will create a whimsical chandelier that won’t take a lot of time or money to make. As with many of these projects, you probably have the materials already lying around the house! Moreover, if not, these items can be purchased inexpensively at the store. DIY lighting is a great way to quickly transform your entertaining space and be able to enjoy the outdoors even after the sun has gone down.
You can find a tutorial online if needed, but the basic idea here is to cover your hula hoop in the fabric of your choice and then attach the icicle lights around the hoop to create the look of a lighted chandelier. Keep in mind that you don’t have to use icicle lights. A string of regular lights would also do, but the icicle lights’ effect is just magical at nighttime! You could also play around with the size of the hoop that you use. A smaller one could be better suited to the size of your entertainment space. Either way, you’ll adore summer nights under this DIY chandelier.
Here is one project that you can go all out and get creative with! Outdoor rugs are built to last, but they can be kind of a drag. Most options are dull, drab colors like gray, beige, and green. Breathe some life into one of these rugs with your favorite color and tape design! You can choose paint colors to compliment your current yard decor or make a bold statement with bright stripes or other patterns. You can complete this affordable DIY project for the yard in one weekend! A quick trip to your local hardware supply store will get you everything you need to complete this fun project.
This project is customizable. You can use whatever size rug you want, even paint more than one, and create whatever design you would like, it’s a blank canvas! Painter’s tape is a great way to help keep your lines straight in your design. A stencil would also be a great item to use here. They can easily be found at your local craft supply store or many places online. Even just painting a unique stencil border on an outdoor rug is sure to help transform your entertaining outdoor space. Just make sure it dries completely before using it again.
This summer project is a simple yet stunning one and will be sure to illuminate your evening garden party! As with many other DIY projects on this list, you most likely have all the materials you need right in your own home. You will just need to gather some tin cans, a hammer and nails, paint, and tealights, and you are set to make these unique, illuminating rustic lanterns for your backyard space. The cans for this project can be almost any size, and varying the dimensions might be a fun way to add some whimsy to your yard decor while lighting it up at night.
A long nail and hammer are all you need to create any stencil design you can think of. You could find pattern inspiration online, but this is also a great project to do with just your imagination. The number of holes you put into the can will allow more and more light to shine through your design. When you are done, a quick coat of paint of your choice and a tea light, and you are ready to enjoy! You can use real candles, tea lights, or even better, citronella candles to light up these beautiful decorations.
Sneaking in a great nap outdoors does not have to mean just throwing a towel onto the lawn or having to find two trees to hang a hammock between. This hanging day bed is sure to provide comfort, and the gentle swaying motion will lull you into a nap. The material for this project includes rope and wood. That way, you can create some type of frame for your bed and some comfortable kind of cushions to lounge on. Don’t forget the pillow and blanket, as you and your family will undoubtedly be spending a lot of time enjoying this project!
The frame could also be a pallet, which would take much of the construction work out of this DIY project. Be sure that the rope you are using is not damaged or frayed. It should be new and consider weight recommendations as you are buying it. Securely attach the rope to the bed frame itself and also to the tree or other roof structure where you are mounting the bed. Lay down your mattress or cushions, pillows, and blanket, and not only you but your friends and family as well, are sure to enjoy this great summer project.
Bright yet beautiful, you can create this look with some frosted glass orbs and strings of lights. Do you need a way to introduce more light to your backyard space? Or want to strike a mood and create more ambiance after dark? This simple DIY project is a great way to do just that. The glass orbs for this project can be repurposed from your house or found at garage/estate sales very inexpensively. The size of these orbs don’t matter too much, just as long as you can enough of an opening to fit a string of lights inside.
Varying the orbs’ size is a great way to add further visual interest to your backyard entertaining space. Moreover, if you don’t want to use plain, “white” lights, choose colored lights instead! A string of blue or red lights, or even a multi-colored set, will add something fun to the look of your yard while quickly transforming your after-dark entertainment space. After you place the string of lights inside the orbs, just add an extension cord that you can tuck away or hide out of sight, and keep enjoying the evening after the sun has gone down.
Keeping the garden hose untangled and free of kinks seems to be a constant struggle for many homeowners, but it doesn’t have to be impossible. With this easy, inexpensive DIY project, you can create this simple holder for your hose out of a few affordable items, and you will be wondering why you never made one sooner. The paint and any finishing touches you put on this project can easily update and transform your backyard space while keeping it organized, too. This project is simple enough that you might even have some of the necessary items in your garage already.
A simple wooden, 4×4 post buried into the ground, with a specific hose hanger or otherwise suitable metal hanger attached to it, is all you need to stop struggling with keeping your hose contained and organized in your yard. You want to make sure you bury enough of the post into the ground to support the weight of your garden hose. Furthermore, be sure to choose a metal hanger sturdy enough to hold the weight, too. While you can paint this project to finish it off, as soon as it is assembled and installed, you are ready to use it!
Getting your tires changed is something most everyone does every year, but don’t just throw them away this time. Keep your old tire(s) and get some yards of rope to create this rustic ottoman you can keep outdoors. It is another fun DIY project that you can make out of recycled materials to transform your backyard space quickly. This ottoman could be used for extra seating and a playful side table or children’s food or game table while entertaining family and friends. You can also make more than one to allow your guests to relax and enjoy your backyard more comfortably.
Only three items are needed to complete this project: a tire, a thick rope, and glue. Using a thicker rope might prove easier to handle and require fewer loops around the tire as you are covering it. There are several resources available online to find detailed tutorials regarding techniques for this DIY project. Depending on the size of the tire you choose to use, it can be extra seating or a table, and the size of it also means it’s easy to move around as needed. You’ll be able to enjoy those summer nights!
This tipsy topsy stand of potted plants looks like it will fall over. However, don’t worry; there is a vertical, wooden bar that each pot is attached to, so they are sturdy! Be ready for rave reviews from your neighbors over this creative DIY project. The necessary supplies for this project are a wooden or metal bar to stack the pots, terra cotta pots, and paint to decorate the pot if you want to. This project can be installed right at ground level or secured in a larger base pot displayed on your porch or back patio.
To begin this project, decorate your terra cotta pots with your desired paint colors or chosen stencil/design before you start the actual assembly of the tower. After the paint is dry, you will install the bar through the center of the first pot, add soil to the desired level, and attach another pot to the bar. Repeat by adding more soil and terra cotta pots while varying the soil depth to create the overall tipsy effect. If you want to be creative, make the top pot flat so that you can add a small bowl for a birdbath.
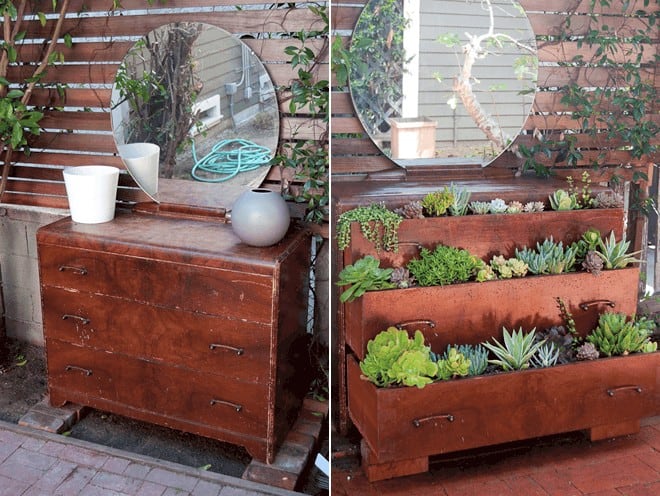
28. Transform an Old Dresser into a Succulent Planter
apkpure.com
Don’t throw away that old dresser! You could convert it into a planter for your succulents instead. Your friends and family will be amazed at this DIY summer project. A dresser that is shorter in height will be a better look for this project, and you could use a nightstand or end table that has a couple of drawers in it as well. Even if you don’t have a dresser in your home to create this succulent planter, you can usually find one on a curb nearby and be able to at a yard sale during the summer.
A quick trip to your local nursery or greenhouse for some plants, such as flowering vines or even herbs, and soil will give you everything you need. Before you begin to plant the dresser, make sure the drawers are still secure and intact and that the bottom of each drawer is sturdy enough to hold the weight of the soil and plants. Next, pull the drawers out at varying lengths to create a nice waterfall effect, add soil and plants, and it’s ready to go! This summer outdoor project only takes a few minutes, and it is a unique way to show off your plants.
Homeowners are now getting rid of chandeliers because they’ve become too dated. However, instead of throwing them away, here is another great DIY project that allows you to reuse items you already have around the house. With a fresh coat of paint, recycle your chandelier, and you can use them as hanging planters. This DIY project is sure to spark a conversation the next time you have family or friends over to entertain. Your new planter could be hung over your outdoor dining set or even from a tree to add a unique pop of color and fun that will transform your outdoor space.
Many styles of chandeliers have glass lanterns or orbs attached to them, and by simply turning them upside down, you now have “containers” to plant in that will create a living chandelier planter! You can easily customize this project by painting your new planter, either all one color or customizing it more by painting the planters a different color. Each planter can easily hold one or two plants. Some type of trailing vine would grow well in this planter, vining downward as well as wrapping around the chandelier as it grows. Another option is to grow herbs in this planter.
There’s no reason you have to use your public water to hydrate your garden and flower beds. Save some serious money on your water bill, and collect rainwater instead. This project can be completed with minimal materials, and it is a great way to transform your yard’s look. A completely assembled rain barrel can be purchased at the store, but you can also create your own with minimal time and effort. The basic design involves a gutter or tube that will funnel the collected rainwater into a barrel and then a spigot on the front to use the water.
The spigot on the front of the barrel will allow you to attach a hose to it to use your water for your plants and vegetable garden, or you can just turn it on to fill your watering can, too. You can also decorate your rain barrel to “hide” it and add some whimsy to your yard decor. By constructing a type of wooden fence, you can easily disguise the barrel’s look, and it will fit in much better with the rest of your yard decor. Why let all of that water go to waste?
Here is a great DIY project if you don’t have enough bird feeders in your yard, and really who does? It is yet another great way to repurpose some old materials this summer. Hold onto your food cans from the kitchen, clean them out and remove any paper labels, and just add a coat of paint to give these cans a new life. Then tie a lovely, colorful ribbon around them to hang outside for your feathered friends. Your children will also enjoy getting in on this project by choosing paint colors and ribbon to hang the new bird feeders.
This project can quickly transform your space’s look, as you can make several in one sitting and hang them together to brighten up any corner in your yard. After painting the cans and adding any designs you would like, it’s a good idea to add a small dowel rod at the can’s opening, so birds have a place to stand on while they eat. Lastly, you can now add the ribbons you chose. Just tie a loop around the can and be sure to leave enough length to hang the feeders from a tree branch in your yard.
Here is another fun project to get your children involved in, and these painted plant markers will help you map out and label what is in your fruit and vegetable garden. Find rocks that resemble your favorite fruits and vegetables and color or paint them accordingly. It is a budget-friendly and creative DIY project that can be turned into a fun, hands-on lesson in colors, shapes, and names of plants for your children, too. You can paint the rocks to look like the fruit and vegetables grown in your garden or just paint their names to use as labels in your yard.
You can take a walk in the woods, along a river, a park, or even stroll around your own backyard to find rocks suitable for this project. They don’t have to be very large, but just big enough to paint your design and faces on if you decide to. Choose paint colors that correspond to the fruits and vegetables you have planted in your garden, and have some fun painting! Then, you can draw some funny faces if you want, too. Place the stones in the garden by the respective seeds. You won’t help but smile every time you tend to your veggies and fruits.
Lighting is something many homeowners can use more of around their home and yard. These lights are easy and affordable to make and can bring a rustic look to your porch. The materials for this project can be found around the home as well. These hanging basket lights are just that. Baskets turned upside down into unique, rustic looking lampshades. You could use any style basket you like, just be sure that the basket’s bottom is big enough to fit the light bulb unit through and house the bulb itself.
These basket lights are meant to bring a touch of country charm to your porch, and the basket style weave allows you to put this project together easily. You could purchase a lamp kit at your local hardware store or even use battery-powered lanterns underneath if your basket is large enough. This project is durable and mobile, limited only by where your imagination tells you to hang them. Moreover, when you’re done, simply turn them off and bring the lights in if you want to spare them during summer storms. It will keep them in good shape for years.
This summer project is another one for both you and your kids. Get some old keys together, and you don’t need anything more than a stick and some twine, and let the fun begin. You’ll have fun creating this pretty wind chime that you can hang outside your kids’ windows or on the porch. Most everyone has old keys lying around that no one knows what they go to anymore. Put those keys to a much more fun use, and create a colorful wind chime with your family. If you have several keys, you and your kids could each make their own chime, too!
You can begin this project by choosing several different paint colors for your keys. Moreover, if you have a variety of keys, it would be fun to switch up the keys’ size on your chime, too. After your keys have dried, you want to tie them onto the twig and then leave enough twine to let them dangle in the breeze. This fun, a budget-friendly DIY project is sure to add a touch of color and whimsy to your backyard decor. Every time the wind blows through the keys, and they make a special twinkle, you will reminisce on this fun summer day.
Pallets are easily disposable once they’ve outlived their usefulness. Sometimes it’s hard to keep finding creative things to do with them. However, give them a new purpose with this simple and easy walkway. It is a quick DIY project that can transform your backyard in a short amount of time. This walkway can be added in between flower beds in your yard. It could be winded through your garden area to gain easier access to your fruits and vegetables. Alternatively, you could use it across a small ditch even if you one in your backyard space.
Most people have a pallet laying around their yard already. However, if not, a neighbor probably does. Or, a quick trip to a local store will also give you just what you need for this project. Once you have your pallet, you just need to break some slats apart from the pallet’s main base. You can make them as long of a walkway as your yard allows! Now you just decide where to place the wood down in some dirt or mulch. That way, you will create a fun, whimsical path that keeps your shoes clean and dry.
Sometimes it’s easy to get in a rut with the same old color scheme of your garden and backyard decor. However, take a cue from the plants right in your own yard and add some pops of color everywhere! The options are pretty much endless with this idea on the list. Don’t be afraid to use bright pops of colors to accentuate your yard and entertaining space. The brighter, the better, as long as they’re paired with some neutral backdrops as well. This project is another one that you and your children alike will love getting involved in.
Your yard should be a reflection of the fun and excitement that you and your family take part in, so dress it up a little with balloons, bubbles, or a big barn! Many ideas can be brought to life in your yard. Gather a bunch of balloons and have fun blowing them up to create a balloon archway in your garden, or let the kids decorate their jungle gym for fun.
Many people have old, used planter pots lying around that just don’t have any life anymore. With only some cement and mosaic tiles, you can give new life to your old planter pots. This project is relatively easy and can be done in a weekend. Let your creative juices flow with this one. You can use old china plates and other pottery kinds that have bright, colorful patterns on them. All you need to do is break up the tile into pieces, and you have a great way to redecorate old, tired planters.
This project can take a little time to complete, so plan to spend the day or at least the afternoon on it. It’s a fun one, though, so get your creative cap on and have some fun with it! You need a few materials for this one, the old planter pots, mosaic tile or china, glass, something to break the tile up with, sturdy outdoor glue, and grout. All you need to do is blue the mosaic pieces of pottery to the planter in any way you choose. The splash of color against the terracotta will create more character in your yard, too.
Don’t throw away that chair that has a busted seat or back. Just rip the fabric out and use the empty hole in the seat to hold your favorite planter! This project can be easy to complete, and you could even place more than one around your garden to add some creativity to it. You can add some paint to the chair or not, as the chair’s worn look can add some rustic charm and whimsy to your backyard decor.
A chair that is in otherwise good shape is a good fit for this project. Usually, the seat is the area that will go first on a chair, and to avoid having to do much repair work on this project before you plant it up, make sure the legs are in good shape. A quick trip to your local nursery or greenhouse will give you many options to choose from for a new flower chair. Now you have a decorative planter that you can place just about anywhere outside. It brings a rustic, old-fashioned look to your yard, depending on the type of chair you pick.
These simple stones can bring a lot of color to your paths and walkways in your yard. It is another project you and your kids can get involved in, too. This easy DIY project is a great way to transform the look of your backyard and garden decor. Some of the materials for this project can be found right in your own home. It won’t take long to get ready to have some fun! Colored glass or gemstones, cement, and a round or square frame are all you will need to get started.
You can recycle some old boxes to use as the mold for these pathway stepping stones. Then you just need to add your favorite gems to the cement while it is drying. Directions for the cement are found on the package. Please keep an eye on the drying process. Why? Because you need to place the stones when the cement is beginning to firm up but not completely dry. You can create whatever design you like. The vibrant tones and glass gems will catch the light and add some spectacular shades to your walkway.
So many sheds have been taken for granted in our backyards. They are painted in dull, drab colors and only have essential structural elements that can make them look dull and lifeless. This summer, you can make your shed the spot for entertainment and party. Add a fresh coat of paint and maybe some decorative designs or textures with slatted wood. You can also update the outside by adding new french doors to make it feel bigger and brighter inside. New outdoor lights on either side of the door are also a significant update to the basic outdoor shed.
You can have even more fun on the inside of your shed as you update it! Decorate the walls with wallpaper, a new coat of paint, and add some artwork or tv for added entertainment. Update or add new lighting inside as well to make your newly created space feel brighter and more inviting. Now consider seating in your shed, and add a chair or two or even a loveseat and recliner. Your newly updated shed can double as your outdoor “patio” without having to build a deck. All that is left to do is invite your friends to come to hang out!