40 Impressive Furniture Makeovers and Transformations

Trista - January 15, 2022
Share

Some furniture pieces are worth keeping, even if their style is not necessarily trendy. Instead of replacing it, why not look into refinishing it? This affordable hobby is all about patience and attention to detail, with an exciting reward at the end. DIY projects are quite easy to pick up, and we are here to show you how some people took their furniture from rags to riches. Some necessary supplies you will need include gloves, eye protection, sanding materials, and any power tools that might be specific to your project. Before any refinishing, make sure to clean your furniture thoroughly and allow any wood to dry fully. Read on as we show you some stunning before and after projects for creative inspiration!


Credit: Carson Downing

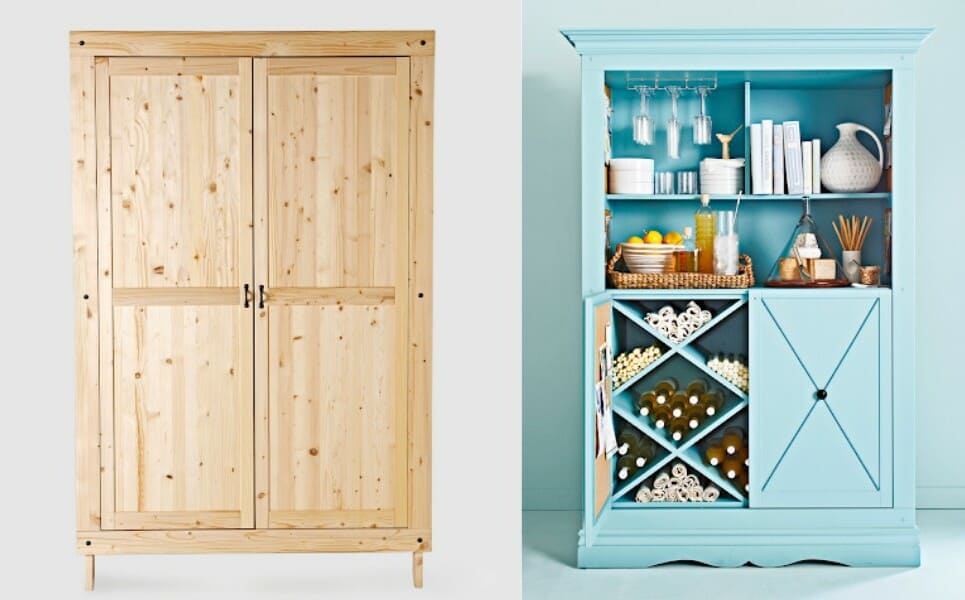
40. Transform an armoire with wallpaper and glass panels!

Though this may seem daunting, it is undoubtedly worth the payoff. The wallpaper in the back with the glass doors makes the piece more modern (via BHG). Furthermore, the organizer with the shelving and newly installed wine glass holders makes clever use of the entire space (via BHG). The whole armoire is now fully utilized and is visually appealing.

Credit: Thirty Eighth Street

39. Bring a pair of nightstands into the modern day!

This drastic transformation may look like a lot, but it is totally manageable if you break it down into the different steps they took. They took the dated, ridged doors off, cleaned off the hardware, and painted the wood a beautiful navy color (via The Budget Decorator). None of it is beyond your skills! It is not about what you are starting with; it is about the potential.

Credit: Love Grows Wild

38. Take a look at this flea market desk flip.

Refinishing this flea market find elevated its original hardware and took it from a piece that was all about function to one that’s about form and function (via The Budget Decorator). It is definitely an eye-catching piece now, meant to be the center of attention in any room. Consider us obsessed!

Credit: Confessions of a Serial DIYer

37. This office dresser went from solemn to farmhouse charm with a coat of paint and thoughtful stenciling.

The DIYer of this piece uses it as office storage, but we sure hope it is stored front and center! This is not a piece that should be hidden in the corner of any space; it deserves to have everyone admire it. Look at those sharp stencil lines! This is definitely a statement piece. To achieve that lovely antique-y look, sand a bit after painting wherever you’d like to highlight (via The Budget Decorator). To get those super crisp lines, use FrogTape – and make sure it is all lined up well!

Credit: Confessions of a Serial DIYer

36. If you need inspiration on how to redo a rocking chair, take a look at this!

Reupholstering sounds terrifying, but it does not need to be. Screws typically hold seats in place. That is, so as long as you can find them, keep them safe, and put them back where they go when you are done, you should be okay. Once you have it unscrewed, you can use a staple gun to cover the seat with whatever fabric you choose (via The Budget Decorator). Fabric stores have so many scraps that you can purchase for cheap! You don’t even need to remove the old one (as long as it is clean). While your seat is still off the frame, slap a coat of paint on the chair. For a more rustic look, sand it down a bit, or leave it as-is for a more polished look (via The Budget Decorator).

Credit: Life on Kaydeross Creek

35. If you like a good farmhouse piece, here’s one for you.

This washstand was indeed dated, but that was nothing that couldn’t be fixed with a coat of paint, new knobs, and, interestingly enough, chicken wire! The DIYer sanded and primed this piece to ensure the white color looked crisp. You can add spackle to the multiple holes for an easy fix (via The Budget Decorator). She attached the chicken wire to the back of the doors with a heavy-duty staple gun after taking the panels off with an oscillating tool (via The Budget Decorator). The rest was putting the piece back together, and voila! New washstand!

Credit: Bless’er House

34. Disappear into Narnia with this sweet armoire-turned-nook!

Who did not desire a secret nook growing up? We kind of want one right now. This DIYer took an armoire that was pretty cool to start with and turned it into a fantastic Narnia-inspired reading nook, equipped with a reading light (via The Budget Decorator)! Take out the bottom two rows of shelving to make room for more books, of course (via The Budget Decorator). Now you have the perfect getaway for a rainy day.

Credit: Melodrama

33. Have you been dreaming of a bold couch but might be too scared to leap? Here’s a great solution.

The great thing about this sofa makeover is that there’s no permanent change here (except to a slipcover). The couch remains intact! This DIYer mixed her own custom shade of dye for her slipcover (via The Budget Decorator). Then, she added her choice of sofa legs after painting them. Finally, she created matching pink buttons so she could have the tufted look she wanted (via The Budget Decorator).

Credit: Artsy Chicks Rule

32. Here’s some inspo for when you browse the marketplace section on your apps and find all those ugly chairs.

The trick to making the paint ‘fabric friendly’ is to water it down a bit and allow it to soak into the fabric instead of laying on top of it. Painting a chair is great for a statement piece, but it may not hold up to heavy use, like a family couch or a favorite recliner. Some fabrics will work better than others (via The Budget Decorator). Why? Because some will hold up better than others. That means it’s always best to spot test (via The Budget Decorator)! Once you are done, go over the whole piece very lightly with sandpaper to soften it a bit, then seal it all over with clear wax.

Credit: Carson Downing

31. Who knew you could entirely transform a dresser with a few wood dowels?

Like many of the “before” images on this list, this dresser was dull. Painting the piece a soothing, neutral color was the first step in giving it its makeover, but not the most impactful (via BHG). Adding the dowels to the front drawers gives it a new level of dimension. Use square wood dowels, cut them to size, and sand them on all edges (via BHG). Then attach them at equal intervals (or whatever design you opt for) with a pin nailer to keep them secure!

Credit: Better Homes & Gardens

30. This DIY furniture makeover shows that creativity knows no bounds!

The side table’s makeover on its own is impressive. Adding legs elevates it (literally and figuratively). It makes it a more impactful piece in the room (via BHG). However, adding the shelving on top truly transforms the DIY furniture into a completely new item (via BHG)! It looks like it was always meant to be this way.

Credit: Better Homes & Gardens

29. Check out another transformation with legs and a coat of paint.

The dimension in this piece is already fantastic; it just needed a little updating. A simple coat of paint and raising it off the floor emphasizes its already beautiful architectural details (via BHG). It makes it an entirely contemporary piece that anyone would love to have in their home! For an extra pop of flair, add cement tiles on the top with adhesive instead of grout (via BHG). That will make it a truly unique piece you won’t find anywhere else.

Credit: Jason Donnelly

28. Take your bookshelf from boring shelving to custom storage space.

This bare-bones bookshelf is a great starting point for any project, especially since you can really let your imagination run wild! Create dividers and vary your shelving heights to store shoes, boots, bags, leashes, and any other accessories (via BHG). You can use the unit as a catchall in your entryway, a nook in the mudroom, or an inconspicuous shelving unit wherever you may need it. You could even wallpaper the backboard for additional flair (via BHG)!

Credit: Better Homes & Gardens

27. In with the old, make it new!

Older furniture tends to have beautiful shapes and excellent quality, though the taste levels have changed. That can be fixed quickly, thankfully. For example, in this chair’s case, all the chair really needs is a fabric update and a coat of paint (via BHG). Since the chair has such a tall back, you can use a large print on it. Paired with the new white color that enhances the cane panels, you’ve got yourself a fancy new chair (via BHG)!

Credit: Better Homes & Gardens

26. Old furniture doesn’t have to stay old.

Looking for potential furniture makeover pieces often requires looking past their dingy current status and truly imagining where they can go or what you could do with them – as we mentioned before, their potential. The before picture is a bit sad, as you can clearly see the chair is not at its best (via BHG). However, the after-shot really tells a story of some bold choices and new life (via BHG)!

Credit: Better Homes & Gardens

25. Have fun with your dresser style.

Although this piece was pretty before the makeover, it is also gorgeous after the DIY furniture makeover. The “before” hardware was a bit overwhelming for the furniture piece, so the “after” selection was sleeker and allowed the chosen paint color to do the work instead (via BHG). The white border was done freehand using a paintbrush, though a white paint marker could also be a great option. Choose the areas that will highlight the curves on the dresser (via BHG).

Credit: Better Homes & Gardens

24. Colorful desks are in!

That poor desk was living in another century; it needed to be brought into the modern day. It had great bones but needed significant prep work like sanding and priming. A bold paint choice was strategic since it helps camouflage intricate details under the paint (via BHG). The new hardware was a must, though it was best to keep it simple to avoid too many bold options in one piece (via BHG).

Credit: Better Homes & Gardens

23. Take an average chair and give it some oomph.

A piece does not need to be completely falling apart or totally hideous to warrant a makeover; sometimes, it just doesn’t speak to you or may not fit in exactly with the decor (via BHG). You don’t need a reason to do a DIY furniture makeover. To mimic this makeover, choose two complementary fabric colors and one new paint shade to add a bit of fun to your dining area (via BHG).

Credit: Better Homes & Gardens

22. Give your old entertainment center a new purpose!

Entertainment centers may not be as necessary for the home as they used to be, especially since newer homes tend to have built-in entertainment centers. If you happen to have one lying around, give it a facelift and a new purpose by modifying it! Remove doors to create open shelving and attach hooks for coats (via BHG). Then, add baskets for storing seasonal items like scarves, flip flops, or swimming gear (via BHG). Paint one side with dry-erase paint to transform it into a message center or add a wall pocket file for essential documents.

Credit: Better Homes & Gardens

21. Upgrade an unfinished armoire into a serving station with a few tweaks.

If storage is an issue for you (which it is for most of us), making a tweak here and there on a roomy armoire might be the solution you need. Cutting the doors in half may sound crazy, but it offers an excellent option for a beverage bar with storage underneath (via BHG). Add a divided shelf for bonus storage and X shelving in the bottom cabinet for bottom or linens if necessary (via BHG).

Credit: Renovated Faith

20. Turn a dresser from “resale reject” into a statement piece.

This dresser needed some serious work, from water-damaged legs, a chipped drawer, broken drawer guides, and a peculiar stinky smell. It was not a makeover for the faint of heart (via Renovated Faith). It definitely paid off in the end! With spray paint, card catalog-style pulls, new legs, and a faux driftwood finish on the oak dresser top, it looks like you could buy it off any boutique website!

Credit: Renovated Faith

19. Take this antique dresser from vintage to modern.

If you have a treasured family piece that you’d like to refresh, make sure to clean it well. Then sand and prime with a light coat (via Renovated Faith). Fill in any cracks with caulk (and make sure you have baby wipes on deck). Also, make sure you let it dry before applying your final coats! If you plan on using your original hardware but want it painted, try spray painting it for an even coat.

Credit: Renovated Faith

18. Create a raw wood look, even if you don’t have it!

Once you have sanded, primed, and otherwise prepped your next chosen piece, here’s the magic potion that will give you the same transformation as above: Sherwin Williams Flax Seed. Once you’ve added your coat of that and allowed it to dry, you’re going to mix your own blend of magic as well: one part water, two parts Valspar’s clear mixing glaze, and two parts Sherwin Williams Van Dyke Brown. Use a brush to wipe a coat on the surface, and voila — raw wood (via Renovated Faith)! If you want a more rustic look, dry brush with some white paint, but that’s totally optional.

Credit: Artsy Chicks Rule

17. Refinish a little file cabinet to store cables, your modem, and other knick-knacks.

Although the before on this piece wasn’t terrible, this little file cabinet was certainly dated. Updating this DIY furniture piece provided a convenient storage spot for all those messy cables that no one wants to see but has no idea what to do with (via Artsy Chicks Rule). This quick DIY furniture makeover is a win-win for everyone because you can use your creative outlet for a practical purpose.

Credit: The Lettered Cottage

16. Give a secretary cabinet an entirely new look with milk paint.

The interesting thing about milk paint is that it creates a distressed look while staying matte and giving an intense depth of color. If you are a fan of chalk paint looks but want something organic and maybe more vintage-inspired, milk paint might be the one for you (via Welsh Design Studios). You can purchase milk paint powder, then mix it by hand for the consistency you want for your project, so that level of responsibility may appeal to you or scare you away.

Credit: Mustard Seed Interiors

15. This beautifully hand-painted dresser makes us all want to try our hand at furniture DIYs.

The new light gray of this made-over dresser truly makes the glass knobs pop! Though we may not all be as brave to hand paint directly on furniture, it is totally worth a shot. This DIYer says that the less she overthinks it, the better. It is all simple strokes, repeated over and over to create an overall design – she even calls it messy! If you are nervous about freehanding, draw out a template ahead of time, or transfer your design with carbon paper (via Welsh Design Studios). Stencils are still a great option if that feels more comfortable to you – there is no right or wrong here.

Credit: Amazon

14. Metal spray paint can create a truly new piece.

This piece was spray-painted a metallic gray to match the rest of the room’s elements (via Buzzfeed). You can see that the original hardware was left intact; refinishing DIY furniture does not have to mean recreating every little thing about it! The newly refurbished dresser gives an entirely new vibe to the room for less than $20 and a few hours of free time (via Buzzfeed).

Credit: Amazon

13. Use outdoor spray paint to redo a cozy patio set!

Spray paint comes in so many varieties now – you can choose from an endless array of options (via Buzzfeed). This cute little outdoor bistro set showed its age in its “before” pic, but with a quick coat of black spray paint, it has been given a second chance at life! Even better, spray paint can easily be changed – if you decide to change things up, you can do it just as quickly as you did the first time (via Buzzfeed).

Credit: Amazon

12. Marble-print contact paper can transform the look of a room.

Breathe new life into old, stained, dingy tables (or countertops) with contact paper (via Buzzfeed). If marble print isn’t your style, choose from one of the dozens of types available! This DIY project is a great afternoon project, even for one person. For best results, grab a blade knife or a sharp pair of scissors and a credit card to smooth out any bubbles. Make sure to read the care instructions to ensure your hard work endures (via Buzzfeed). Adding a coat of polyurethane can make it last even longer, but make sure it is precisely where you want it before you do that!

Credit: Little House on the Corner

11. Sanding furniture will make you feel alive.

How gorgeous is the after picture on this? Sanding down an old piece of furniture is oddly satisfying. Once you have sanded down all your surfaces, prime them with your choice of primer (via Buzzfeed). There is oil-based or water-based, depending on your project. Then add your own flair of design to suit your taste (via Buzzfeed). Nothing is as rewarding as seeing your creation come together with your own hard work. It’s like your personal version of HGTV!

Credit: Amazon

10. Turn an old headboard and footboard set into a cute little outdoor bench!

Clearing out garages can take forever, right? Maybe you have an old headboard and footboard in your space that you can use to create a DIY headboard bench for your patio or even your front porch. This bench is deceptively simple to make, so don’t let how good it looks scare you away (via Buzzfeed)! Make sure to measure twice and cut once and pick a happy color that brings you joy (via Buzzfeed).

Credit: Amazon

9. Refinishing furniture does not always have to mean going bright and bold!

Sometimes, you can look at an old piece of furniture and know exactly what it needs. In the case of this old hutch, it was calling out for dark chalkboard paint (via Buzzfeed)! Its new finish gives it a dark, impressive stature, and it is on its way to becoming a new at-home coffee bar! Be mindful when using chalkboard paint. Why? Because it does need to be sealed before using the piece to ensure the paint does not flake off. Once it is sealed, it is ready to go (via Buzzfeed)!

Credit: Amazon

8. Chalkboard paint is fun for DIY furniture ideas.

If you have an old piece of furniture (or can get your hands on a cheap one), painting them with chalkboard paint could provide a great, non-disposable alternative to paper (via Buzzfeed). Entertain toddlers and younger kiddos for a while by allowing them to draw on furniture! Clean-up is also much easier than picking up paper or broken crayons. The biggest challenge will be teaching them which furniture pieces are okay to draw on!

Credit: Amazon

7. Chalkboard paint and new hardware can create an entirely new piece!

One of the most wonderful things about chalk paint is that you can skip the sanding and priming if you really need to. The most critical step to any DIY furniture upcycle is the cleaning at the start (via Buzzfeed). You will be amazed at how much grime accumulates on furniture. The second most crucial step with chalk paint is sealing (via Buzzfeed). Once those two steps are locked and loaded, the rest is all about your taste! Have fun picking out your hardware!

Credit: Amazon

6. Another great way to give new life to furniture is with detailed stenciling.

Stencils may seem intimidating at first, but they really can change the entire look and feel of a piece. If you are interested in adding a stencil, a few tricks make it easier. First, consider buying multiples of the stencil so you can lay them all out before you start painting (via Buzzfeed). Tape them to the surface you are painting to make sure they do not shift and use the right brushes or applicators for the paint you are using (via Buzzfeed). It may feel expensive, but it’s definitely cheaper than buying a pre-made piece, and it’ll be easier than going back and fixing it!

Credit: Amazon

5. Sometimes, you don’t need to do significant work to have a significant visual change.

When we talk about refinishing furniture, we usually think about sanding, priming, and painting, but that is not always necessary to change the look of a piece! Sometimes something as simple as changing the hardware on a dresser can totally revamp the DIY furniture and make it fit in more cohesively with the room’s aesthetic. In this before and after, merely changing the knobs from basic black to blue glass knobs (via Buzzfeed). That quick change made it more unique and customized to the room (via Buzzfeed)!

Credit: Kristi Murphy

4. Sometimes, pieces are beautiful but too expensive. A few tweaks to more affordable furniture can make easy replicas!

Like those in the “after” picture, sideboards can sometimes retail for over $1,000 (via Buzzfeed). If that’s a bit steep, that’s completely understandable. Living on a budget no longer means having to live with the furniture we don’t like; we can do it ourselves! Carefully placed brass strips and replaced pintuck legs create an entirely new piece without sanding or painting (via Buzzfeed).

Credit: Homemade Ginger

3. Try this DIY furniture makeover for something a little more rustic.

If you wistfully scroll through Anthropologie, Urban Outfitters, and West Elm and wish you could load up your cart with their home items, try your hand at something like this. This wicker stool went from frumpy to boho chic with a quick paint job and some decorative rope (via Buzzfeed). It’s much simpler than you think it is and definitely adds a cozy, rustic element to any room it will be in!

Credit: Salvaged Inspirations

2. Layer your paint colors to create a stunning piece.

Do you know that whole “trust the process” thing that artists sometimes say? There is a lot of trust involved in this process. You have to layer three colors of chalk paint and some black wax on top to make this stunner, so if you aren’t game for a challenge, maybe this is not the piece for you. You’ll have to implement random dry brush techniques, then even spray the painted dresser with water (via Salvaged Inspirations)! Once the paints dry, they look entirely different from their wet look, so again: trust the process.

Credit: Salvaged Inspirations

1. Don’t be afraid to use decals!

To get this amazing look, after sanding and prepping, you’ll want to blend your wet paints on the dresser wherever you want your fading to be (via Salvaged Inspirations). You can find whatever ‘transfer’ style you envision, remove the backing, apply it, and smooth it down with the enclosed applicator. In this DIY furniture makeover, the transfer was sanded slightly to cut the contrast and blend it further into the dresser (via Salvaged Inspirations). It was then sealed with clear spray and tada! A gorgeous, one-of-a-kind dresser!

Advertisement