DIY At It’s Best: Save Money Doing These Home Repairs Yourself

Ashley - May 4, 2023
Share

When you make the leap into homeownership, you’re probably anticipating taking on a few expensive repairs throughout your time in that home. Paying out of pocket for home repairs is one of the many reasons people avoid buying a home and choose to rent instead. But you don’t have to panic and call a professional whenever something breaks around the house. There are a ton of easy home repairs you can do yourself with a tiny bit of time and knowledge. These DIY projects will save you big in the long run, so you can spend your hard-earned money doing things you enjoy, like taking that vacation you’ve been putting off. Get ready to take some notes and run out to the nearest hardware store because you’ll be a home repair DIY expert by the time you’ve finished reading this list!

Photo Credit: decorating.visacastas.com

Use Ice Cubes To Remove Carpet Dents

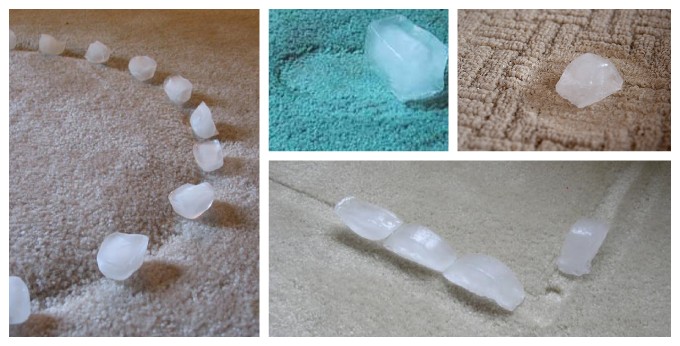
Moving furniture around is a great way to update the feng shui in your home, but it can reveal some ugly dents in your carpets. Thankfully, there’s a super easy way to remove these dents that doesn’t require calling a professional carpet cleaner. All you need are some ice cubes and a hard-bristled brush. Place the ice cubes in the dent and let them melt. You’ll see the carpet fibers soften once the ice has melted. Then, take your brush and scrub the carpet to fluff up the threads. You can also use a slightly different method to solve this issue. Take a damp dishcloth or towel and lay it in the dent. Then, take an iron on medium heat for 30-60 seconds. Be careful not to let the iron touch the carpet directly because it’ll burn and smell awful! Always vacuum over the carpet after for a seamless, clean look.

Photo Credit: pinterest.com

Learn To Hang Drywall Yourself

Taking on any major project around the home can be daunting, especially when trying to finish a room. Unfinished basements often look unsightly, but you’ll spend a lot of money hiring professionals to do things you can easily do yourself! Hanging drywall isn’t that tough as long as you have the right tools and knowledge. All you need to do is measure how big of a piece of drywall you need, mark the drywall before you cut it, cut out the correctly-sized piece, and attach it to the wall. This is a relatively easy process that you can learn by watching a Youtube video or reading an article. If you’re confident enough and have the time, the next stages of mudding, sanding, and painting can also be done yourself!

Photo Credit: thekitchn.com

Eliminate Soap Scum Without Struggle

Did you know the number one room most people hire help to clean in their homes is the bathroom? There’s no wonder most people don’t want to spend time deep cleaning their bathtubs, especially if they struggle with back pain. Bending over to scrub the scum out of your tub can be painful and time-consuming, but there’s another option than hiring help. All you need for this hack is the same broom you sweep your floors with and the same bottle of Dawn dish soap you use in the kitchen! Pour the dish soap into the tub, focusing mainly on the problem areas. Let it sit for a few minutes to start breaking down the soap scum. Then, use the broom to scrub your tub and rinse everything thoroughly with hot water when you’re done. Your tub will be sparkling clean in less than 15 minutes with this method and you won’t have to deal with back pain or hire outside help to have a clean tub to soak in.

Photo Credit: bobvila.com

Install Plank Flooring Yourself

Putting in new flooring is one of the most costly ventures a homeowner can take on. You can save yourself a bundle and still have gorgeous-looking floors when you use plank flooring. This type of flooring typically resembles hardwood (although you can buy it in other designs as well) and is super easy to install yourself. They rest on the subfloor and don’t require nails or glue to lay down. You just lay down the pieces, cut them to size when necessary, and enjoy your new floor. Plank flooring is sold at most home improvement stores like Home Depot, Lowes, and even Walmart, so you’ll definitely be able to find some near you.

Photo Credit: thespruce.com

DIY Recipe To Unclog Your Drains

Clogged drains are one of the biggest reasons plumbers get called out to homes, and it’s such a shame because there’s an easy DIY recipe you can use to unclog those drains yourself! Whether you live in an old home with slow plumbing or you live with kids who love to shove things down your drains, this recipe will help push any clogs along and keep things running smoothly. The first thing you want to do is pour boiling water down your drain. Next, pour 1/2 cup of baking soda down the drain (you can add 1/4 cup of salt during this step as well, but that’s optional). Last, pour 1/2 cup of white vinegar down the drain. Leave the drain for 10 minutes and then flush it thoroughly with hot water.

Photo Credit: rd.com

Use Nail Polish To Seal Window Screens

Window screens are great for keeping bugs out, but they’re so easy to damage! Very few things are more annoying than realizing your new window screen has tiny tears but don’t panic. All you need is a little nail polish to fix this issue. Pain the nail polish over the tears or holes to bind the screen together and create a protective barrier. This will prevent any bugs or other unwanted outdoor guests from getting inside. You can also use nail polish to seal small cracks in the window itself. You’ll want to buy some screen repair tape from your local hardware store for more extensive tears in your screen.

Photo Credit: melanielissackinteriors.com

Remove Unsightly Ceiling Water Stains

Looking at these water stains gives most people the ick. We understand wanting the stain gone, but you don’t need to hire a professional for this task. It’s super easy to remove the stains yourself, and all you need are a few items you have lying around the house. Grab an empty spray bottle and fill it with one part bleach and three parts water. Spray the stain with the mixture and let it sit for about 10 minutes. Then, gently blot the area with a paper towel and repeat this process until the stain is gone. This mixture works well for removing other things from your ceilings and walls, like caked-on dust and grime. To give your home the best chance of staying clean, make sure you’re dusting at least once a week and cleaning up any new messes immediately!

Photo Credit: nixsensor.com

Repair Small Holes In An Afternoon

No matter how hard you try to avoid it, holes will inevitably end up in your walls at some point. They can be the result of hanging pictures and decorations or an accidental run-in with a sharp or heavy object. Regardless of how the holes got there, you’ll want to take care of those eyesores immediately! All you need is a little pre-mixed spackle, something to smooth it over the hole with, sandpaper, and paint. Simply fill the hole and the immediate area with the spackle, smooth it over with a putty knife or something similar, and sand the hole. Then, you can paint it over, and your wall will look as good as new! If you don’t have the exact same paint, you can probably get away with coloring it in with a marker if you’re not too worried about getting a perfect match.

Photo Credit: cleanipedia.com

DIY Recipe For Cleaning Washing Machines

Did you know you should be cleaning your washing machine once a month? It’s the best way to keep your machine fully functional and prevent any breakdowns of the interior parts. Keeping up with your washing machine’s cleaning can prevent a costly repair bill, so this hack can be a huge money saver! Use a large bowl or bucket to combine the following ingredients: 2 cups of vinegar, 1/4 cup of baking soda, and 1/4 cup of water. Use this mixture and a soft-bristled brush to scrub the inside of your washer and any interior parts you’ve removed for cleaning. Dry the interior parts with a microfiber cloth and replace them in your machine. Repeat this once a month to keep your washing machine working at full capacity for a long time!

Photo Credit: inthewash.co.uk

Remove Rust From Chrome Fixtures

Chrome fixtures tend to get very rusty over time. Not only does this look unsightly, but it will eventually ruin your fixtures. Rather than waiting for them to get unusable and replace them, try this easy hack to remove the rust. All you need is some aluminum foil and clean water. (Note: make sure to clean the fixture with warm, soapy water and a clean cloth first!) Crumple up your aluminum foil into a ball and dip it into the clean water. Then, gently rub the aluminum foil ball against any rust spots. You’ll be amazed at how quickly the rust disappears! This trick isn’t limited to just fixtures, either. You can use it for anything made of chrome, including car parts, bicycle parts, or work tools. If the rust persists, try dipping the foil into a carbonated soda drink. The carbonic acid should help loosen up that rust and get it off.

Photo Credit: familyhandyman.com

Use Graphite For Sticky Locks

There’s nothing worse than getting home from a long day at work and realizing your key doesn’t want to slide into the lock on your front door. This can be very aggravating, especially if you’re trying to avoid dealing with a locksmith. Thankfully, there’s an easy and inexpensive trick to get your lock to cooperate again. Simply take a pencil and rub the graphite along the teeth of your key. Press the key into the lock and then pull it back out. Recoat the pencil and reinsert it. Do this several times until the key slides in and out of the lock smoothly. You can also buy tubes of powered graphite online that you can squeeze into the lock when it’s getting sticky!

Photo Credit: washingtonpost.com

Prevent Scratches With Felt Stickers

Moving around furniture, especially pulling chairs in and out from the table every day, can cause tons of wear and tear on your floor. Eventually, this might lead to you needing to pay to refinish your floor, which is a super expensive bill. Rather than deal with all that stress, try this super simple solution instead! Go to your nearest hardware store or shop online to find some felt stickers. They come in all shapes and sizes, so you’ll easily be able to find some that fit the feet of your furniture. Place the stickers on the feet of your chairs, tables, etc, and test it out. These work wonderfully for reducing wear and tear on your floors, and they also reduce noise. Plus, they look way better than the tennis balls our teachers used in school!

Photo Credit: frador.com

Many people don’t realize the impact their gutters can have on their homes. If your gutters aren’t set up well enough, and the water isn’t being redirected far enough away from your home, then you will eventually see foundation damage as the water seeps down and weakens the structure of your home. All you need to resolve this issue are flexible corrugated drainpipes, which are available at most hardware stores. Use the drainpipes to lengthen your gutters and redirect the flow of water away from your home. You can even get creative and set up a bit of a waterfall with rocks and other natural pieces from your yard. This will be especially helpful during storms and help prevent flooding in your basement!

Photo Credit: familyhandyman.com

Remove Water From Your Basement

Even if you do everything in your power to prevent water from getting into your basement, it might still happen on occasion. This can be pretty discouraging, but you don’t need to call a professional to suck the water back out. Put on your waders, grab a wet/dry shop vacuum and a dehumidifier, and make your way into the mess. Suck the water into the vacuum and deposit it outside in a safe area away from your home. Once all the water is gone, use a dehumidifier to reduce the chance of mold and mildew growth. If you do notice mold growth after this, then you’ll want to call in a professional. Mold cleanup is not something you want to try to DIY!

Photo Credit: diyjoy.com

Use Ice Cubes To Clean Your Garbage Disposal

Garbage disposals can get pretty dirty. Unfortunately, they also start to smell really bad when they get dirty enough, so it’s important to know how to efficiently clean your garbage disposal. This method is super easy and very effective! Just shove as many ice cubes down your garbage disposal as you can and let it run for a while. Pour some hot water mixed with lemon juice down the drain when most of the ice cubes are gone for a little extra freshness. Here are some extra tips for taking care of your garbage disposal: avoid putting fiborous foods down your disposal because the strings can cling to the interior parts and create clogs. Also, avoid super starchy foods like potatoes because they can create a paste in your disposal that essentially acts like a glue. If that happens, all the ice cubes in the world won’t fix it and it’ll be time to call in a professional.

Photo Credit: mobilebaymag.com

Unstick Windows That Are Painted Shut

We all know that awful feeling when you’ve finished repainting a room and go to open a window, only to realize it’s accidentally been painted shut! This can be pretty demoralizing, but there’s a super easy fix. All you need is a utility knife and a putty knife to get that window open again. Take your utility knife and score the paint all around the window where’s it’s been painted shut. Then, jiggle the putty knife into the openings all around the window until you think it’s safe to try opening it. If the paint’s been left for a long time or is particularly persistent, then you may need to use a prybar to gently force the window open. Just be very careful while you’re doing this to avoid damaging the window frame!

Photo Credit: nytimes.com

Rotate Your Ceiling Fan Seasonally

Did you know that almost all ceiling fans come with a switch on the base that allows you to change the direction the fans rotate in? No? Well, you learn something knew everyday! This trick will help you save money on your energy bills by increasing the efficiency of distributing air through your home. In every room with a ceiling fan, make sure the fans are rotating clockwise during the winter and counterclockwise during the summer. When your fans rotate clockwise, it creates an updraft that helps pull cold air to the top of the room. Conversely, during the summer, rotating the fans counterclockwise will help push cool air down and pull hot air up! Trust us on this one. Your energy bills will thank you!

Photo Credit: bobvila.com

Fix The Water Pressure In 3 Easy Steps

Plenty of homeowners have called in a plumber for water pressure issues. No one wants to deal with low water pressure when they’re trying to take a shower, but there’s an easy way to fix it yourself. Most water pressure issues are caused by the pressure-reducing valve located near where you main water line enters the house. Once you find the bell-shaped valve, loosen the locknut and then turn the bolt on the valve to adjust your water pressure. Turn counterclockwise to decrease it or clockwise to increase it. Adjust a half-turn at a time and check your water pressure. Repeat if necessary.

Photo Credit: umamidays.com

Eliminate Squeaky Door Hinges With Cooking Spray

Everyone knows WD-40 is the best way to stop a door hinge from squeaking, but there are other options, too. When you don’t have any of that magical WD-40 lying around, reach into your kitchen cabinet and grab a bottle of cooking spray. Spray the squeaky door hinge and pull the door open and closed until the squeaking is completely gone. Make sure you wipe off any leftover cooking spray residue afterward. It’s important to remember to wipe off any remaining spray residue because that stuff is a magnet for dirt, dust, and grime. You’ll spend much longer cleaning all that off the oily parts of your door that got sprayed than giving it a quick wipe down right after you try this trick.

Photo Credit: bobvila.com

Replace Old Caulking

Old caulking around bathtubs, toilets, and sinks gets very dirty. It also becomes ineffective and creates an eyesore in your otherwise clean bathroom. Removing and replacing caulking probably sounds like a job you’d want to call a professional for, but it’s not difficult to do yourself. All you need is some caulk remover, a putty knife, and new caulk. First, spread the caulk remover over the caulk and let it sit according to the package’s instructions. Then, scrape it away with a putty knife. Once all the old caulk is removed and you’ve cleaned up any dust or grime, lay down a line of new caulk. Smooth it down with for finger for that clean, seamless look we all love. This should take less than 30 minutes and save you a ton of money!

Photo Credit: pinterest.com

Remove Pet Hair With A Squeegee

Anyone who’s lived with pets understands the insane amount of hair they shed daily! Pets are adorable, fun, and great companions, but they sure do make a mess. Rather than spending an arm and a leg on the latest pet hair vacuum, try this simple trick! Take the same squeegee you use to clean your windows and drag it across your carpet. You’ll be amazed (and a little horrified) by the amount of hair you pull up. You can follow this trick up by mixing 1 part fabric softener with 3 parts water in a spray bottle. Spray your carpet well, and then run your vacuum over it. You’ll suck up any remaining hairs and it’ll help your carpet to look fluffy and new again.

Photo Credit: holidaysparkle.blogspot.com

Get Your Grout Sparkling Clean

Cleaning the grout on your kitchen floor is probably one of your least favorite chores, and we don’t blame you! Grout gets really dirty over time, and it’s nearly impossible to get it to look sparkling clean again. But there’s an easy trick that will get it clean and looking fresh again. All you need is a scrub brush and some toilet bowl cleaner. Douse the grout in the toilet bowl cleaner and leave it to sit for several minutes. Then, take your scrub brush and go to town. When you’re all done scrubbing the grout, run your mop over the floor to clean up any excess dirt that escaped from the grout. You’ll only need to do this every once in a while to keep your floors looking squeaky clean.

Photo Credit: alreadytiredtomorrow.com

Clean The Glass Panes Between Your Oven Doors

Many people go their entire lives without knowing they can clean the glass panes between their oven doors. It seems like something you would only trust a professional with, but it’s actually super simple to do yourself! Here’s how it works. Pull down your oven door and locate the three screws keeping the doors together, just like in the picture above. Remove the screws and lift up the top door. Then, clean the glass panes inside with your preferred cleaner. Use a microfiber cloth to dry the panes, or leave them to airdry. After that, you just need to screw the doors back in place. It’s really that easy! You’re oven will look like it’s been professionally cleaned with this trick.

Photo Credit: thekitchn.com

Clean Greasy Cabinets With Ease

It’s impossible to keep grease from gathering on your cabinets, especially the ones that sit just above your stove. Most of the time, all you need to remove these nasty grease marks is some dish soap and a clean cloth. But tougher grease spots require more than that. Here’s what you can do: take some baking soda and sprinkle it on the cabinets that have the worst grease stains. Dip a clean scrub brush in warm water and scrub away until the majority of the grease residue is gone. Then, go over it again with some dish soap. You’ll have degreased cabinets in no time with this trick!

Photo Credit: bhg.com

Clean Your Old, Dirty Baking Sheets

How many times you have thrown away an old baking sheet because it’s gotten so caked with debris and grease that you didn’t feel comfortable using it anymore? This trick will take a little time, but it will restore the lost life to your baking sheets and make them look brand new again! Start by boiling a few cups of water. Pour the water into the baking sheet and add a few tablespoons of baking soda. Wait for the solution to stop bubbling and then let it sit for an hour. When you come back to the pan, use a brillo pad to scrape away all the burned-on debris and grease. Then, wash it again with hot water and dish soap.

Photo Credit: buzzfeed.com

Remove Stubborn Grime And Soap Scum

People will spend a lot of money on cleaning products and supplies, but it’s often not necessary. You don’t need to shell out dozens of dollars to keep your bathroom looking sparkling clean. All you need is the power of warm water, white vinegar, a good scrub brush, and plenty of elbow grease. Here’s the method you want to use: mix a solution of half water and half white vinegar into a spray bottle. Spray the solution all over your shower and focus most heavily on the areas that are coated with grime and soap scum. Leave the mixture to sit for half an hour. If the messes are particularly stubborn, then reapply the mixture and wait another ten minutes. Then, go in with your scrub brush and get to work! The grim and scum should easily come off with this trick. Also, if you’re dealing with a particularly nasty shower or tub, run your shower with super hot water for a few minutes before applying the mixture. The steam will help start to loosen things up.

Photo Credit: hgtv.com

Stencil Your Patio Like A Pro

Are you looking to spend more time on your patio this summer? Want to give your patio a makeover? Don’t rush out to call a professional! You can easily stencil your patio like a pro all by yourself. Here’s what you’ll need: concrete stain, a plastic stencil, a high-quality stencil brush, and a few hours of time. Lay out your plastic stencil, and use the stencil brush to smooth the concrete stain over the design. This is a project that can be done in an afternoon, and the results are stunning! Your patio will be the talk of the neighborhood and the perfect place to host all summer long.

Photo Credit: pinterest.com

Try Peel-And-Stick Wallpaper

Most interior design experts will tell you that wallpaper is a job for professionals. However, there’s another option that will give you the same spark of vibrant colors and patterns that professional wallpaper offers for a fraction of the cost! Peel-and-stick wallpaper is easy to apply yourself and comes in a wide variety of colors and patterns. You’ll find something for every room in your home with this material. Find the perfect design for your baby’s nursery, something tranquil for your bedroom, and the perfect neutral backsplash for your kitchen.

Photo Credit: dukesanddutchessess.com

Stain Wood With Kool-Aid

Whether you’re building a birdhouse or touching up an old side table, kool-aid can help you with the finishing touches. You don’t need to spend a ton of money on expensive wood stain when you can easily use a packet of kool-aid instead! This is a super easy process that will look great and last for years. All you need to do is mix a few packets of kool-aid in a bowl with warm water. Stir the mixture together until all the kool-aid is dissolved. Then, put small pieces of wood in the mixture, or use a brush to brush the mixture on the wood. Let it sit overnight and reapply if necessary. You’ll have gorgeous stained wood for a fraction of the usual cost!

Photo Credit: thepinjunkie.com

Spray Paint Your Door Knobs

Are you tired of looking at old, dated doorknobs around your home? It’s tempting to simply replace the doorknobs, but that can really add up when you’re spending $30 for a single doorknob! Plus, it takes a good bit of effort to remove a doorknob and put a new one in place. Eliminate all that stress and hassle by spray painting your doorknobs instead! You’ll want to use painters tape to keep the spray paint from getting all over your door, but this is a super easy project that you can complete in an afternoon, and it’s much cheaper than replacing every doorknob in your home. The results will still look stunning more than a year later and it’s very easy to give the doorknobs the occasional touch-up if necessary.

Photo Credit: homedit.com

Add A Fancy Touch Around Your Light Switches

Want to give your home a custom, fancy interior design vibe without having to hire a professional decorator? We have the perfect solution for you! This trick is so simple and effective that it will blow your mind and make all your guests ask you for advice for their own homes. Measure your light switch to get the correct dimensions, and then find a picture frame that will fit snugly around you. You can find picture frames with intricate designs and colors like the one in this picture, or use simpler ones for a cleaner feel. Either way, your home will have a unique touch that you’ll notice you enter a room.

Photo Credit: wd40.com.au

Use WD-40 To Erase Crayon And Marker Fom Walls

This one is for the tired parents who are sick of scrubbing their walls every few days and still having a mess left behind. Save all that precious scrubbing time and give it back to your kids instead by using WD-40 to easily remove crayon and marker scribbles from your walls. Just spray the WD-40 straight onto the wall and wipe away the mess with a clean cloth. A quick warning: only use this trick if your walls have a bit of sheen to them. If your walls are matte, don’t use WD-40 because it can leave stains. Instead, use a magic eraser to remove the marks and keep some spare paint around to touch up your walls if necessary.

Advertisement