Genius Ideas for Creating Your Backyard Sanctuary

Chuvic - April 16, 2023
Share

Are you looking to spice up your outdoor space and take it to the next level? In this article we will showcase some of the most innovative and exciting ways to transform your outdoor space into a true oasis. From dazzling lighting arrangements to stunning water features, we’ve got you covered with every upgrade imaginable. So, get ready to be inspired and take your outdoor space to a whole new level!

Photo credit: hometalk.com

Create a Romantic Ambiance with Solar-Powered Stump Lights

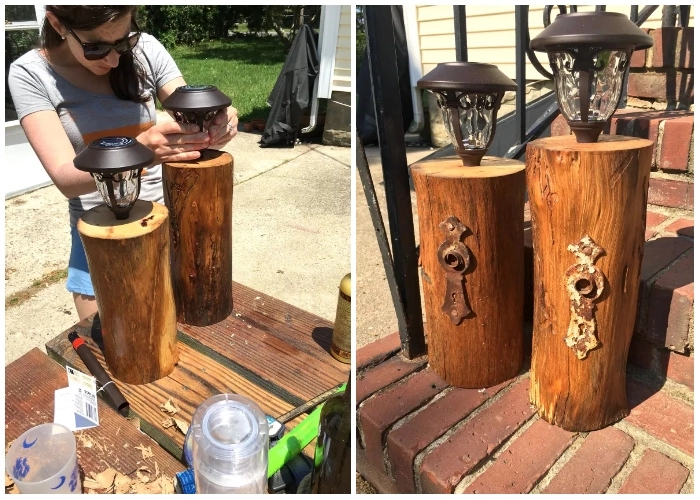
To construct these charming stump lights, start by removing the solar light from its current post. Then, select the paddle bit that fits best with the solar light post. For inexpensive single solar lights available at most hardware stores, a 13/16 bit is typically suitable. Once you’ve chosen your bit, mark the center of your stump and begin drilling. Aim for a depth of around 3/4″. After drilling, generously apply beeswax to the stumps, repeating the process a few times. Finally, place the solar lights into the holes you’ve created, and enjoy the romantic atmosphere they provide.

Photo credit: Pinterest

Welcome Guests to Your Grilling Area

Transform your yard into the ultimate grilling destination – it’s easier than you think! Get an outdoor counter space to set up your dining table, and pick out a grill that suits your needs and style. To ensure safety and convenience for all, try not to place the grill on the grass – instead, choose a flat surface with no combustible materials nearby. Be aware of low-hanging branches and bushes in the vicinity, too. For optimal safety, keep the grill at least 10 feet away from your house. With these simple tips in mind, you can now host backyard barbecues without worrying about any potential hazards.

Photo credit: homestratosphere.com

Build a Bug-Free Gazebo

Designing a gazebo or tent with a net that is free of pesky bugs can be a daunting task, but with the right approach, it can be achieved easily. By incorporating a trellis or tent into your yard’s pathway, you can add a touch of sophistication to the area while creating distinct spaces in your garden, such as an adult area and a children’s area. To make it more appealing and comfortable, install a net around the gazebo to keep the bugs at bay, and adorn it with beautiful flowers and plants to create an aesthetically pleasing atmosphere. In addition, to create a more comfortable and functional outdoor living space, consider hanging a curtain around the gazebo and adding a bench or seat to maximize the area’s utilization. However, when using a ladder to construct a trellis, ensure that the feet are firmly planted into the ground, as the foliage tends to catch the wind.

Photo credit: rebeccasbirdgardensblog.blogspot.com

Grow Your Own Food with a DIY Vertical Garden

Explore unconventional gardening techniques, such as vertical planting and shelf gardening, to add a unique twist to your gardening experience. Opting for vertical gardening can be a smart choice if you’re working with limited outdoor space. Consider investing in an outdoor shelf to accommodate your fragrant herbs. Not only is vertical gardening practical, but it also opens up new possibilities for creative expression. To create a mystical and enchanting ambiance in your garden, consider incorporating a pond. For a fun and rewarding experience, try planting vegetable seeds in the spring. After they have sprouted, transfer them to a small plastic greenhouse outside until they are strong enough to be transplanted into your garden or containers.

Photo credit: suburbanfarmonline.com

Make Your Own Ollas for Garden Irrigation

Looking for a natural and cost-effective watering solution for your plants? Consider making your own Ollas! This old irrigation method involves using unglazed, porous clay pots buried in the root area of plants, with the exposed necks allowing water to seep into the soil and provide a steady supply of water. While pre-made Ollas can be expensive, making your own is easy and affordable. Check out some helpful how-to videos on Youtube from other gardeners who have used inexpensive terracotta pots to create their own Ollas. Save money and ensure your plants stay hydrated with this simple and sustainable watering approach!

Photo credit: Pinterest

Install a Fountain to Create a Calming Atmosphere

There’s something about the sound of water trickling against rocks that just soothes the soul. So, installing a fountain in your yard won’t just serve as a stunning centerpiece, but it can also have a calming effect on the mind and body. And if you want to take your fountain experience to the next level, consider adding some aquarium fish for an extra touch of relaxation. But with so many designs and sizes to choose from, where do you start? Whether you want a petite fountain or an extravagant one, the possibilities are endless. And the placement of your fountain is just as important as its design. A central location in a formal garden showcases its grandeur, while a corner or along a garden path creates a natural, laid-back feel.

Photo credit: runtoradiance.com

Use Paint to Revamp Your Drab Concrete Pathway

Are you tired of staring at your dull, lifeless concrete pathway or porch? It’s time to upgrade it with a fresh coat of paint! Start by deep cleaning the concrete with a mixture of Tide Oxi and warm water. Once dry, use exterior painter’s tape to mark off the edges and create any desired stripes or patterns. Next, grab a small roller and your favorite concrete paint and get to work. Roll on one coat, wait until the next day, and then add a second for a more polished look. Dry time is around 4 hours, but it’s best to wait 10 hours before carefully peeling off all the tape. Voila! You’ve successfully upgraded your pathway or porch with a fresh, new look.

Photo credit: apartmenttherapy.com

Make a No-Dig Garden

Looking for a hassle-free and eco-friendly way to start a garden? This no-dig garden uses a revolutionary technique which requires no tilling or digging, making it both easy and sustainable.

But where to begin? The first step is all about the design – choose the shape and size that suits your fancy. Next, level the area where you want your garden bed to be. Once that’s done, it’s time to lay down the magic. Start by layering newspaper, 10 to 20 layers thick, all over the designated area – this prevents those pesky weeds from taking root. Then, add a light layer of blood and bone meal and give it a good watering. After that, add a layer of alfalfa, followed by another layer of blood and bone meal, and water again. Top it all off with a layer of straw, another sprinkling of the blood and bone meal, and another watering. Finally, add your organic compost, 2-4 inches thick. Water that too, and voila – your no-dig garden is ready to be planted!

Photo credit: cloudinary.com

Create a DIY Outdoor Hot Tub

Enjoy your outdoor space even more by installing a hot tub in your backyard. Hot tubs are great for cold nights spent outside, and they don’t take up too much of the yard’s area – you can place it above or below ground, on your patio or against the fence. For maximum safety, make sure the hot tub is installed over a sturdy foundation that can sustain its full weight, like a level concrete pad or reinforced deck. Create a stable, insulated hot tub with galvanized steel in your own backyard. Start by choosing an appropriate spot and building a rectangular frame with the steel. Next, install insulation and a liner inside the frame. Assemble the walls, lid, valves, and any additional equipment needed for proper functioning. Once it’s ready, fill up with clean water and enjoy!

Photo credit: ecosnippets.com

Build a Raised Garden Bed with Cinder Blocks

Are you ready to take your gardening skills to the next level? Look no further than constructing your very own raised garden bed with cinder blocks! In this guide, we’ll walk you through the process step-by-step for creating an impressive 18-feet long and 4.5-feet wide garden bed. After measuring and marking out your garden bed area, you’ll dig into the dirt and start arranging the durable cinder blocks to ensure a level structure. With 32 bricks on each layer, hardware cloth and landscaping fabric are then placed beneath them to keep pests and weeds away. The soil is then added, and you’re ready to plant! With the flexibility to plant directly into the blocks, you’ll be effortlessly growing a garden fit for a green thumb.

Photo credit: Pinterest

Create a Sustainable Paver Path

Looking for a sustainable solution for your paver paths? Look no further than Turfstone – these grid-shaped concrete pavers not only prevent soil erosion on steep slopes, but also provide excellent traction for garden equipment. And installation is a breeze! First, set the Paver Path Depth. Remove sod and dirt to a depth of 3-1/2 inches below the surrounding lawn and smooth the soil to create an even surface. Arrange the pavers end-to-end to form the path, curving as desired. Gaps are no problem since they will be filled in by grass. Next, add good-quality, lump-free soil into each square and lightly tamp down to prepare for the sod. Then you can now install Sod Squares. Enjoy your beautiful new paver path that will continue to grow and thrive with time!

Photo credit: worldtravelling.com

Elevate Your Backyard Aesthetic with Mosaic Walkways

The walkway in your backyard is a defining feature that can be elevated with the incorporation of functional art pieces. For those looking to add a bold statement to their outdoor space, mosaic walkways are a must-try. With their use of stones or tile pieces arranged in various patterns and shapes, mosaic walkways add a pop of color and intrigue to their surroundings.

When working with mosaic pieces, it’s crucial to use the right bonding material to ensure durability and stability. For outdoor and wet mosaics, thinset is the preferred option over adhesives. Made of portland cement and polymers, thinset is a bonding mortar that offers exceptional strength and stickiness. This is particularly important when working with non-porous glass mosaic tiles, which can be difficult to secure.

Photo credit: Pinterest

Turn Your Yard into a Playground

Transform your backyard into a thrill-seeking playground with these amazing DIY ideas! If you have hilly terrain, why not install slides for your kids to enjoy? Build a treehouse, set up a swing set or make the most of any existing structures. Clear the area of any large rocks or sharp debris and mow any grass as short as possible. Examine the hardware on playground equipment to ensure it’s safe. Any play equipment that’s elevated off the ground should have enclosed railings for maximum safety and fun. Give your kids hours of backyard entertainment with these simple preparations!

Photo credit: squarespace-cdn.com

Create a Minimalist Space

Transform your backyard into an entertainment oasis with minimal effort! Focus on the main idea, like a pool or hot tub, and work the rest around it. You can also grill outdoors for family fun or keep the garden manageable by focusing on one or two spots instead of planting a “garden” around the yard’s perimeter. Use no-mow grass or ground cover plants to save time and maintenance effort while also choosing terracotta pots to grow your favorite plants. These simple ideas will give you a more minimal, organized look without compromising on style!

Photo credit: engineeringdiscoveries.com

Build a Pathway With a DIY Pavement Mold

To create a pathway using a pavement mold, start by calculating the amount of concrete needed for the project. It’s recommended to use one 80-pound bag of concrete for every 2 feet of the pathway. Next, remove the sod from the area using a spade. While you can lay the pavers directly onto the ground, it’s best to remove 2 to 4 inches of soil and add gravel into the trench for optimal results. Compact and level the gravel. Prepare the concrete mix with a mud-like consistency. Place the stencil form at one end of the pathway and shovel or trowel the concrete into the form. Pat the mix down to ensure it fills all corners and cavities of the mold. Lift the form straight up to avoid snagging or damaging the wet pavers. Immediately hose off the form to prevent the mix from hardening. Repeat until the pathway is finished.

Photo credit: underlayforwoodenfloor.blogspot.com

Upgrade Your Backyard with a DIY Brick Fire Pit

Upgrade Your Backyard with a DIY Brick Fire Pit! For just $80, you can create a stunning fire pit that’s both functional and beautiful. All you need is 48 Tan 3-1/2″ x 7″ x 7″ Belgian Wedge Wall Blocks, 48 Quarry Gray 3-1/2″ x 1-3/4″ x 7″ Small Belgian Wall Blocks, 3 bags of Multi-Purpose Gravel (1/2 cu ft each) and 2 bags of Paver Leveling Sand (1/2 cu ft each). Mark the perimeter of your fire pit, dig out the area and make sure the ground is level. Lay the first row of bricks and then add the gravel to set it into the sand. Then add more rows of bricks and finish off your fire pit with perimeter gravel, creating an oasis right in your backyard!

Photo credit: tasteofhome.com

An Easy Hack for Planting

Use a muffin tin to create evenly spaced indentations in your soil for planting seeds or plants. You can use the tin as a guide to ensure the rest of your garden or raised bed is properly aligned. Mini-muffin tins can also be used to adjust seed spacing for different types of plants. Keep in mind that not all seeds can be planted using this method since various produce requires different amounts of space. For instance, bulb vegetables like carrots, parsnips, beets, and onions need around three inches of space between each seed and can be planted in a standard-size muffin tray. This hack works best with recently tilled and aerated soil, and may not be as effective with hard, rocky, or clay-rich soil. The best results will be achieved with high-quality tilled soil.

Photo credit: realtor.com

Use a Stock Tank to Create a Kiddy Pool

Looking for a creative way to beat the heat this summer? Consider building a stock tank pool for a fun family project! These galvanized tanks, typically used for livestock, can easily be transformed into a cool and unique swimming pool. Check out local farm and feed stores or browse online retailers for a variety of sizes and styles, all with a rust-resistant coating for durability. Look for a heavy-duty zinc G90 coating to withstand harsh weather conditions and ensure your pool lasts for many years. Luckily, setting up your own stock tank pool is a straightforward and enjoyable weekend project, with clear instructions readily available. Treat your family to a refreshing and exciting summer experience with a DIY stock tank pool!

Photo credit: Pinterest

A Great Way to Store Garden Hose

Looking for a neat storage solution for your hose? Consider these options for your traditional home! Wall-mount hose reels are convenient but require drilling permanent holes. If you prefer a temporary solution, try a freestanding cart or station like the one pictured. With so many design options available, choose a style that complements your home’s aesthetic. For a touch of elegance, consider brass or copper finishes with fine detailing that will withstand the test of time. Balance practicality and beauty when choosing your hose storage solution.

Photo credit: Pinterest

Build a Patio with Gravel and Pavers

Creating a stunning patio doesn’t require exceptional artistic ability. Taking a few minutes to draw out a plan will aid in visualizing the necessary steps and bring attention to any oversights, potentially preventing costly mistakes. The following step is to mark out the excavation area using spray paint or chalk. Once the edging is in place, the digging can commence to the appropriate depth. If using pea gravel or pavers, a depth of 2-3 inches is necessary, and it’s essential to maintain uniform depth by checking both corners with a tape measure throughout the process.

Photo credit: Pinterest

Add Colors with Different Kinds of Plants

Transform your yard into a vibrant outdoor oasis with colorful plants! Whether you’re a fan of bold and bright cacti or classic red roses, there are plenty of stunning options to choose from that will bring your garden to life in a natural and therapeutic way. Simply head to your local gardening store, buy some new blooms and strategically place them around your yard. The benefits of adding color to your garden go beyond just aesthetics. Warm colors such as yellow, orange, and red have the power to make a large garden bed appear cozier, while simultaneously infusing your garden with a lively and energetic vibe. On the other hand, cool colors like blue and purple create a sense of spaciousness, making even small spaces feel larger, while also inspiring peace and tranquility.

Photo credit: Pinterest

Reuse Old Bricks to Build Raised Beds

To build raised beds from reclaimed bricks, begin by aligning the first bed with the deck and marking out the area with string. Dig out a rectangle from the grass and fill it with a mix of MOT and sharp sand, leveling it with a decking board spirit level and a mallet. Apply mortar to the MOT base and place a brick on top, checking it with the spirit level and tapping it into place with the mallet. Continue adding bricks until the desired height is reached. Fill the raised bed with a mixture of topsoil and compost and then plant your seeds and plants.

Photo credit: Pinterest

Growth a Beautiful Container Garden

Transform your backyard into a stunning green oasis with a simple and affordable DIY container garden! Using pots, you can easily create a beautiful and lush garden that complements your home’s aesthetic. Choose a variety of plants to add color and texture, such as flowers, herbs, and succulents. The options are endless, from vibrant petunias to fragrant lavender to hearty oregano. When selecting pots, mix and match sizes and shapes for visual interest. Hang baskets or place pots at different heights for even more drama. With just a little effort, you can enjoy a gorgeous garden that adds value to your home and enhances your outdoor living space.

Photo credit: Pinterest

Create a Millboard Decked Terrace

Step outside and be amazed by the stunning decked terrace that perfectly complements this recently extended property. The deck is crafted from Millboard, a revolutionary composite material that boasts a slip-resistant and maintenance-free finish, while still looking and feeling just like natural wood. What sets this deck apart is its level transition from indoors to outdoors, creating a seamless flow between the two spaces.

But that’s not all! The deck wraps around the extension and connects with a small sun deck, all bordered by a beautiful planting strip, providing a touch of natural beauty to the space. The star of the show, however, are the oak sleeper steps that lead to the garden, adding elegance and natural beauty to an already impressive outdoor area.

Photo credit: Pinterest

Create Your Own Outdoor Shower with Resort-Style Flair

If you’re an avid pool user, building an outdoor shower may be a wise consideration. It allows for a thorough rinse of chlorine before entering your home and provides an easy solution for washing off dirt and grime from gardening. The good news is that outdoor showers usually don’t require complicated drainage systems, particularly if positioned at a distance from the home or if the land slopes naturally away from the structure. However, drainage options may vary based on the location, soil type, and local regulations. Therefore, it’s important to consider factors like wastewater volume and proximity to existing structures.

Photo credit: instructables.com

Create a Cozy Outdoor Retreat with a Stylish Hammock

Swing into relaxation with a hammock that not only provides a tranquil spot to relax with a good book, but also complements the look of your outdoor space. With a variety of colors and styles to choose from, you can find a hammock that perfectly matches your taste and the ambiance of your backyard. Why settle for just one? Add multiple hammocks in different areas of your yard to maximize your unwind time and create a cozy atmosphere. Don’t have a hammock stand? Not a problem. Hang your hammock between fence posts or trees using heavy-duty screw hooks, tree straps, chains, or high-test marine nylon rope. Enjoy the ultimate outdoor escape with a stylish hammock that helps you unwind and recharge.

Photo credit: livefreecreative.co

Add Warmth to Your Yard Using Brick Pavers

To achieve a warmer look, start by removing the old mortar from the reclaimed bricks using a chisel, hammer, and a sturdy surface. Keep the removed mortar as it will be needed for the project. Next, prepare the area where the bricks will be placed. Rototill the site a few times and then level it by raking it out. To begin the pattern, lay newspaper and sand over the raked area. Layer several newspapers to act as a weed barrier, and they will naturally biodegrade. Create your desired pattern by using clean and dry sand as a base for the brick. Spread sand over the bricks to fill in the crevices and create a firm pad. To edge the project, use the raised bed and the shed

Photo credit: jennasuedesign.com

Create Your Own Barrel Planters

To begin, it’s recommended to stain or paint 4×4 wooden posts with dark walnut stain and sealer since pressure-treated wood’s natural coloring may not be appealing. Attaching the posts to the barrel planters using corner braces on two sides is optional but recommended to keep them in place while the concrete dries. Once the braces are secured to the wooden posts, center them inside the barrel and screw them to the bottom. Fill the barrel with water and add concrete to the planters, filling them to approximately half capacity using two bags and a 50/50 water mix. Before planting flowers, drill several holes above the concrete in the barrel for drainage. To further improve drainage, add rocks and spread them around the bottom of each barrel, followed by potting soil. Finally, plant your seeds or plants, and enjoy your new barrel planters.

Photo credit: shopify.com

DIY Concrete Garden With Spheres, Balls, and Globes

To make your own concrete garden spheres, first prepare a thick cake batter consistency concrete mix. Coat the inside of the glass spheres with cooking spray and fill them with the concrete mix. Make sure the mix has a pourable consistency, not too wet or dry. Avoid filling the globe’s neck to keep it as round as possible. Place the spheres upright in a cool location within a plastic bag and let them dry for a couple of days. To remove the glass, smash it gently with the side of a hammer, while keeping the spheres in the bag to prevent flying glass fragments. Once the spheres have dried completely, place them in your garden to add an interesting touch.

Photo credit: Pinterest

Leave Spaces Between Concrete Pavers For Flowers and Moss

Are you ready to get your hands dirty with some DIY? Learn how to make your own concrete pavers in just a few steps! First, plan out your space and make a form with 2x4s. Once the form is in place, dig and pour a layer of gravel before mixing and pouring the concrete. Use a trowel and sawing motion to level and smooth the concrete, and finish with a rubber float and edger for clean edges. Once the pavers dry, remove the form and address any rough spots by adding a thin layer of portland cement. Finally, fill in the gaps with dirt and enjoy your brand-new pavers. Impress your friends and family with this stunning DIY project and add functional beauty to your outdoor space.

Photo credit: Pinterest

Create a Family Movie Theatre in Your Own Backyard

Bring the movie theater experience to your own backyard with a few simple tools. With an initial investment in a projector, stand or table to place it on, video source, outdoor projector screen, and powered speakers and speaker stands, you can make the most of your family movie nights while roasting marshmallows by the fire pit. To set up your very own mini-theater, select a white sheet as your screen – it will provide the best resolution for the films you want to watch. After that’s all taken care of, put together a list of fun movies everyone will love and get ready for a night full of entertainment and memories!

Photo credit: hometalk.com

Replace Some Parts of the Lawn with Rocks

To upscale your lawn, you’ll need to start by removing the sod. Begin at the wood fence line and roll it up. Once all the sod is removed, place the edging bricks (also known as Bullet edgers) along the house. You’ll need approximately 64 bricks for this project. To prevent weeds and grass from growing up through the rocks, lay down wet newspaper over the soil before filling the space with rocks. Pour three bags of stones onto the garden bed and arrange them as desired. Once the rocks are in place, apply a concrete sealer to add some shine and protect them.

Photo credit: acnnhome.com

Build a Wooden Fence

Looking for privacy and style in your yard? Consider lining it with a fence! Not only will it give you a sense of privacy, but it also presents an opportunity to showcase your personal style and creativity. You can transform an ordinary fence into a visual masterpiece by adding your own decorative touches, such as marble accents or colorful paint.

For a more refined and elegant look, opt for a dark wooden or cast iron fence. And don’t be afraid to play with height – the taller the fence, the more privacy you’ll have. But there’s more than one way to soften the look of a fence! Adding plants can not only camouflage an unsightly fence but also create a visually cohesive landscape. For smaller gardens with limited space, narrow-growing plants that hug the fence line and are easily contained are an excellent choice.

Photo credit: Pinterest

Maximize Your Outdoor Space with Stylish Steps

Take your backyard to another level with the addition of stairs. Not only will this create an illusion of a more spacious area, it’ll also make it easier for you and your guests to navigate around the different areas. From mosaics to tiles, you can choose from a variety of materials such as stone and rustic wood for your garden steps. Plus, with less formal measurements than indoor stairs, you can get creative and DIY them according to the theme of your outdoor space. Transform your backyard into a cozy retreat and pull focus towards the staircase – it could become the center of attention.

With these upgrades, you can create an outdoor space that is truly personalized while staying on budget. Whether you choose vibrant colors or natural materials, there’s something for everyone. There’s always a way to get creative with customizing your backyard! So don’t wait any longer and get started today on making your personal paradise a reality.


Advertisement