How To Paint Like A Pro: Painting Hacks for DIY Home Improvement

Chuvic - March 12, 2023
Share

Have you ever walked into a room and felt like it was missing something? Maybe it lacks personality or a certain ambiance that would make it feel more inviting. Well, did you know that you have the power to completely transform the vibe of a space with just a simple coat of paint? Yes, you heard that right – painting is a DIY hack that can make you feel like a professional interior designer!

Now, before you start getting nervous about your lack of experience, let me tell you that anyone can paint like a pro with the right hacks. You don’t need to spend a fortune hiring a professional painter or be an artistic genius to create a beautiful space. All you need is a little bit of creativity and a few helpful tips to get you started. Here are some of the most helpful DIY painting hacks for home improvement you can try yourself:

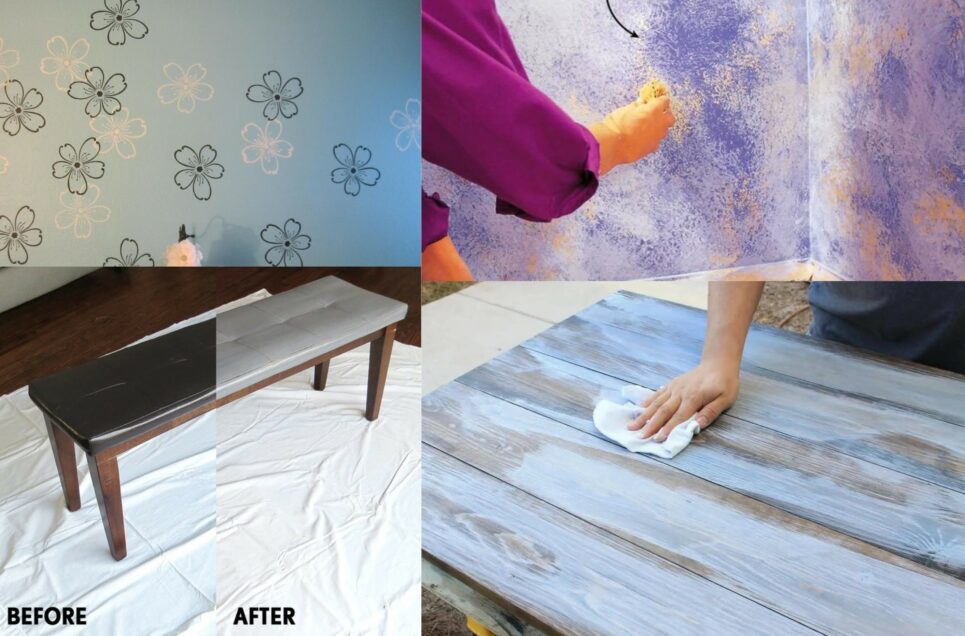
Add Texture with a Sponge

Photo credit: decoist.com

Sponging is a simple yet effective technique for adding texture and visual interest to any room. Whether you choose a natural sea sponge or a synthetic sponge, the results are sure to impress. By dipping the sponge into the paint and dabbing it onto the wall in a random pattern, you can create a unique and eye-catching effect. The beauty of this technique lies in its versatility. You can experiment with different colors and shades to create a range of effects, from a subtle, understated texture to a more dramatic and layered look. Sponging also allows you to add depth and dimension to a space, making it feel more dynamic and engaging.

Clean Your Paintbrushes with Vinegar

Photo credit: Pinterest

Cleaning your paintbrushes is an important step in maintaining them and extending their lifespan. If you’re a DIY home improvement painter, using vinegar is an effective and affordable way to clean your paintbrushes. Simply pour vinegar into a container and soak the paintbrush for 30 minutes to an hour, depending on how dirty it is. Use a brush comb or your fingers to remove any remaining paint residue. Rinse the brush with warm water, reshape the bristles, and let it dry. Vinegar is a natural and non-toxic cleaning solution that breaks down paint and removes any buildup on your brushes.

Minimize Your Mess with Your Own DIY Brush Holder

Photo credit: rachelschultz.com

Next time you finish off a milk jug, don’t throw it away just yet. Cut out one side of the jug to create a spout and use it as a holder for your paintbrush. The spout allows you to rest your brush safely without it touching anything else, and the bottom section of the jug can be used to hold paint.

This simple hack not only keeps your work area clean but also saves you the trouble of constantly searching for a safe spot to rest your brush. Plus, it’s a fun and creative way to upcycle items in your home!

Speed Up Your Paint Mixing with a Drill Attachment

Photo credit: Pinterest

If you’re tired of spending time manually mixing paint, using a paint mixer attachment for a drill can save you time and effort. This attachment can easily be attached to a standard drill and can mix paint quickly and efficiently, providing a smooth and consistent mixture. It’s especially useful for larger painting projects where you need to mix larger quantities of paint. Additionally, using a paint mixer attachment for a drill ensures that the paint is thoroughly mixed, preventing any inconsistencies in color or texture. With this simple tool, you can save time and achieve a professional-looking paint job with ease.

Reusable Paint Trays

Photo credit: marthastewart.com

Painting your home yourself can be a daunting task, but it doesn’t have to be! Not only do you save money by doing it yourself, but you can also have some fun along the way. However, dealing with the cleanup can be a drag, especially when it comes to washing paint trays.

But fear not. There’s a simple solution! By lining your paint tray with a plastic bag or foil, you can easily remove any leftover paint and avoid the hassle of cleaning it thoroughly. This hack allows you to reuse your paint trays and saves you time and effort. Say goodbye to the chore of cleaning paint trays and focus on creating a beautiful space that you can be proud of!

Paint Pads for Better Reach

Photo credit: familyhandyman.com

Let’s face it, clearing out a room just to paint it is a hassle. Not only do you have to find another place for all your belongings, but if you live with a roommate, it can be disruptive to their space too. But don’t worry, we have a solution for you! A paint pad attached to a stick is the perfect tool for the job if you want to avoid moving everything and disturbing everyone in a ten-meter radius. You can even use a simple paint stirring stick to get the job done. With this hack, you can transform your room without the headache of moving everything around.

Use a Spray Gun for Painting Large Pieces

Photo credit: paintschoices.blogspot.com

If you’re tackling a painting project that involves a large piece of furniture, using a spray gun can save you time and effort while providing a more even coat of paint. Spray guns are particularly useful for surfaces with intricate details or hard-to-reach areas that can be a challenge to cover with a brush. By using a spray gun, you can apply paint more quickly and evenly, resulting in a smoother and more professional finish. Additionally, a spray gun can help you avoid drips and brush strokes that can occur with traditional painting methods.

Use a Paint Grid for Even Coverage

Photo credit: bergerpaints.com

Using a paint grid is an easy way to ensure you’re using the right amount of paint and getting an even coverage. A paint grid is a rectangular piece of plastic with ridges that fit inside a paint bucket. When you dip your roller into the paint, it’s easy to accidentally overload it with paint, which can lead to drips and an uneven coat. But with a paint grid, you can remove the excess paint and ensure that you’re using the right amount for each stroke. The ridges on the grid help distribute the paint evenly across the roller, which can also help prevent streaks.

Using a paint grid is a simple step that can save you time and frustration in the long run. So next time you’re painting, consider investing in a paint grid and see the difference it can make.

Choose the Right Brush or Roller for Your Paint

Photo credit: .bobvila.com

Selecting the right brush or roller for your paint can make a big difference in the quality of your finished project. For oil-based paints, it is best to use a paint brush or roller cover with synthetic bristles. Synthetic bristles can withstand the harsh chemicals in oil-based paints and are easier to clean than natural bristles. On the other hand, water-based paints are better suited for natural bristle brushes or roller covers. Natural bristles are able to absorb water and hold more paint than synthetic bristles, resulting in a smoother and more even application. When choosing a brush or roller, be sure to read the label to ensure it is compatible with the type of paint you are using.

Repurpose Household Items

Photo credit: hggghjj-gsatjy.blogspot.com

You don’t need to buy expensive painting supplies to achieve a professional-looking paint job. Many household items can be repurposed as painting tools. For example, a plastic lid from a container can be used as a paint palette, and an old toothbrush can be used to create texture on a painted surface. You can also use an old credit card to spread paint evenly. Additionally, you can create your own stencils using cardboard or even lace fabric. By repurposing household items, you can personalize your painting projects and make them more meaningful.

Use a Hair Dryer

Photo credit: Pinterest

Using a hair dryer can be a quick and effective way to speed up the drying time of your paint when you’re in a hurry. It’s a handy tool to have when you need your painted surfaces to dry quickly, such as when you need to paint multiple coats in one day. By holding the hair dryer a few inches away from the painted surface and using it in a cool setting, you can help the paint dry faster without causing any damage. However, it’s important to keep the hair dryer moving constantly and avoid holding it too close to the painted surface, as this can cause the paint to blister or bubble. Also, note that a hair dryer may not be suitable for all types of paint, so be sure to read the manufacturer’s instructions before using it.

Paint in the Right Order

Photo credit: landoflaurel.com

Painting in the right order is crucial to achieving a professional-looking finish, while also saving you time and effort. When starting your painting project, it’s best to begin with the ceiling, then move on to the walls, and finish with the trim. This order allows you to avoid any paint drips or splatters on previously painted surfaces. Additionally, if you’re working on a room with multiple walls, it’s best to start with the wall opposite the door and work your way around the room. By doing this, you can ensure a seamless finish, with no noticeable differences in color or texture between the walls. Moreover, it’s essential to allow each painted surface to dry completely before moving on to the next, to avoid smudging or ruining the previous coat of paint.

Use Masking Tape to Create a Geometric Accent Wall

Photo credit: Pinterest

With the growing popularity of geometric patterns in interior design, creating a bold accent wall using masking tape is a simple and effective way to make a statement. All you need to get started is some masking tape and paint in your desired color. Decide on a geometric pattern that you want to create, such as triangles or diamonds, and apply the tape to the wall accordingly. Be sure to press the tape firmly onto the wall to prevent any bleeding of paint. Once you’ve applied the tape, paint over the area with your chosen color. It’s best to use a small roller or a brush to ensure a smooth and even coat of paint. Once the paint has dried, carefully remove the tape to reveal your perfectly formed geometric shape.

This technique allows you to create a personalized accent wall without committing to a permanent design. You can experiment with different colors and shapes until you find the perfect combination for your space.

Use Stencils to Create a Pattern

Photo credit: Pinterest

Stencils are a great way to add a pattern or design to a room without the hassle of freehand painting. Luckily, you don’t have to be an artist to create a beautiful stencil design in your room. You can find a variety of stencils online or make your own with materials like cardboard or plastic sheets. Once you have your stencil, tape it to the wall and use a paintbrush or roller to apply the paint. You can use multiple stencils to create a layered effect or experiment with different colors to create a gradient. With stenciling, you can add a unique touch to your walls without the hassle of freehand painting.

Experiment with Color Blocking

Photo credit: Pinterest

In addition to creating a visually striking effect, color blocking is a practical solution for adding interest to a room. This technique is especially useful for rooms with high ceilings, where it can be challenging to create a cozy atmosphere. By using a bold color on the bottom half of the wall and a lighter color on the top half, you can visually lower the ceiling and create a more intimate feel in the space. Color blocking also provides an opportunity to play with different color combinations and express your personal style. Whether you choose to go with bright, bold colors or subtle, muted tones, color blocking is a versatile and effective way to add some drama to your decor.

Create an Ombre Effect

Photo credit: Pinterest

If you’re looking for a unique and trendy way to add some depth and dimension to your walls, the ombre technique might just be what you need. This popular method involves gradually blending one color into another, creating a gradient effect that can range from subtle to dramatic. You can create an ombre effect on a wall by painting the top of the wall one color and gradually blending it into another color at the bottom. You can use a sponge or a roller to blend the colors together. This technique works particularly well in bedrooms and bathrooms.

Add Glamour with Metallic Paint

Photo credit: Pinterest

If you’re looking to add some shine and glamour to your home decor, metallic paint is an excellent choice. You can use it to create an accent wall or highlight architectural details such as crown molding or baseboards. Metallic paint works particularly well in living rooms and dining rooms, where it can reflect light and create a luxurious atmosphere. When selecting a metallic paint, consider the finish – a high-gloss finish will provide the most shine, while a satin or matte finish will be more subtle. With metallic paint, you can transform a dull room into a glamorous and sophisticated space that will leave a lasting impression.

Paint the Ceiling

Photo credit: styleunder40.com

Most people focus on painting the walls, but the ceiling is also a great canvas for creativity. Don’t overlook your ceiling as a potential canvas for creativity. Instead of leaving it plain white, consider painting it a bold color or using stencils to create a pattern. This technique can add an unexpected pop of visual interest to any room, particularly in bedrooms and bathrooms. If you choose to paint your ceiling a bold color, keep the walls neutral to balance the look. For a patterned effect, use stencils or painter’s tape to create your desired design.

Achieve a Smooth Finish When Painting a Door

Photo credit: familyhandyman.com

To achieve a smooth finish when painting a door, it’s important to lay it flat and remove all hardware including hinges and knobs. By laying the door flat on sawhorses, you can easily spread paint without worrying about drips or sags. To make this process easier, drill one 3/16-inch hole in the bottom of the door and two at the top. Then, turn 4-inch by 1/4-inch lag screws 1-1/2 inches into the door and rest it on the sawhorses. This allows you to paint both sides in a day without the door touching either side. Simply rotate the door on the single bolt at the bottom while holding the other two bolts to paint the second side.

Choose the Right Paint

stlpainters.com

The type of paint you choose will affect the final result of your project. For furniture, you want a paint that is durable and easy to clean. Oil-based paints are the most durable but can be more difficult to work with. Water-based latex paints are easier to use and dry faster but may not be as durable. Choose a paint that is specifically formulated for furniture, as these will often have additional additives to help with adhesion and durability.

Thoroughly Cleaning Your Walls Before a Paint Job

Photo credit: slayathomemother.com

To ensure a successful paint job, proper preparation of your walls is key. Just like your new rolling brush, your walls will also require some prep work. Despite regularly cleaning your home, it’s unlikely that you’ve ever given your walls a good scrub. However, it’s important to do so before painting.

Cleaning your walls prior to painting is easier and more effective than trying to tackle a grimy, dusty surface. A quick wipe-down with a Swiffer stick and towel will do the trick. By taking the time to prepare your walls, you’ll create a smoother surface for paint application and ensure a longer-lasting finish.

Prime the Furniture

Photo credit: theartsuppliers.com

When painting over a dark or glossy surface, it’s crucial to prime the furniture first. Priming prepares the surface for painting by creating a smooth, even base for the paint to adhere to. Without a primer, the new paint may not adhere well, resulting in a patchy or uneven finish. Additionally, if the old paint or wood contains stains or oils, they may bleed through the new paint, causing discoloration or blemishes. Choosing a primer that is compatible with the type of paint you plan to use will ensure the best possible results.

Use Painter’s Tape for Clean Lines

Photo credit: lifehacker.com

Painter’s tape is an essential tool for any DIY painting project. It can help you achieve clean lines and prevent paint from bleeding onto adjacent surfaces. Before you start painting, use painter’s tape to mask off areas you don’t want to paint, such as baseboards, window frames, and door frames. Be sure to press the tape down firmly to create a tight seal and remove it before the paint is completely dry to prevent it from peeling.

Create a Painting Station

Photo credit: Pinterest

Creating a designated painting station can help you stay organized and avoid making a mess. Start by finding a flat surface, such as a table or countertop, and cover it with a plastic sheet or old newspapers to protect it from paint spills. Then, arrange your painting supplies within easy reach of your station to keep everything organized and accessible. This could include brushes, rollers, paint cans, and any other tools you might need. Having a dedicated painting station not only makes it easier to start and stop your projects, but it also ensures that your supplies are always within reach when you need them.

Use a Quality Paintbrush

Photo credit: proconstructionguide.com

If you’re painting furniture, investing in a high-quality paintbrush is essential for achieving a smooth and professional-looking finish. Cheap brushes can often leave unsightly streaks, brush marks, and even hairs on the surface, ruining the overall look of your project. That’s why it’s important to choose a good quality brush that is appropriate for the type of paint you’re using, whether it be water-based or oil-based. The right brush can make all the difference, ensuring that your furniture looks polished and well-crafted. So, next time you’re painting furniture, consider investing in a high-quality brush that will help you achieve the results you’re after.

Mix Paint Cans Together

Photo credit: hgtv.com

When painting a large area like a whole room, it’s important to ensure consistency in color throughout the space. One way to achieve this is by mixing all of your paint cans together before starting the project. When you mix the paint cans together, it creates a uniform color that eliminates any subtle differences in color that can occur when using different cans of the same paint. To do this, pour all the cans of paint you will be using into a large bucket and mix them together thoroughly. This process not only ensures consistent color but can also help you avoid running out of paint mid-project by providing you with a larger supply.

Apply a Protective Coat to Your Furniture

Photo credit: themountainviewcottage.net

After spending time and effort to achieve the perfect finish on your furniture, it’s important to protect it from wear and tear. A clear coat can help prevent scratches, chips, and fading caused by everyday use. It’s important to choose a clear coat that is compatible with the type of paint you used and apply it in thin, even layers to avoid drips and bubbles. Applying a protective coat can also give your furniture a glossy finish, enhancing its appearance and adding durability.

Use a Paint Edger For a Professional Finish

Photo credit: bobvila.com

If you’re tired of using painter’s tape to achieve clean edges and corners when painting, consider using a paint edger. This handy tool can save you time and effort while ensuring a professional-looking finish. A paint edger works by providing a guide for your brush or roller, allowing you to paint right up to the edge without going over. This can help you achieve sharp and clean lines, even in hard-to-reach areas. Additionally, a paint edger can help you avoid the hassle and mess of using tape. With a paint edger, you can achieve a flawless finish in less time, making it a valuable tool for any painting project.

Transform Old Leather Furniture with Leather Paint

Photo credit: familyhandyman.com

Transforming an old piece of leather furniture into a modern showstopper is easier than you might think with the help of leather paint. Start by cleaning and conditioning the leather to ensure it’s in good condition for painting. Choose a leather paint color that complements your decor and apply it evenly with a brush or sponge. Allow the first coat to dry completely before applying a second coat for added coverage. You can even add a stencil or design to make your piece truly unique. Finish by applying a leather sealer to protect your newly painted furniture from wear and tear.

Apply Multiple Thin Coats

Photo credit: wsimg.com

For a smooth and flawless paint finish, apply multiple thin coats of paint rather than one thick coat. By applying several thin coats of paint, you can ensure better coverage and a more even finish. This technique also helps to prevent drips and clumps that can occur when applying a thick layer of paint. Additionally, thin coats of paint dry faster, allowing you to apply subsequent coats sooner, saving you time in the long run. While it may take a little more time to apply several thin coats of paint, the result will be a stunning, professional-looking finish that will make your paint job stand out.

Ensure Proper Ventilation when Painting

Photo credit: dorm-room-collections.blogsport.com

Proper ventilation is crucial when it comes to painting. Before starting your painting project, it’s important to ensure that you’re in a well-ventilated area. This means opening windows and doors to allow for proper air circulation and prevent fumes and odors from building up in the room. Inhaling paint fumes for prolonged periods can cause headaches, dizziness, and nausea. If you’re spray-painting small objects, it’s best to take them outside. But if you must paint in a closed room, always wear a mask and protective gloves to further reduce the risk of inhaling any harmful chemicals.

Quick Clean-up with Damp Rags

Photo credit: thespruce.com

Painting can be a messy task, but keeping a damp rag nearby can make it much easier to clean up any spills or drips as they happen. This simple DIY hack can save time and frustration during your painting project. By having a damp rag on hand, you can quickly wipe away any excess paint before it has a chance to dry and become more difficult to remove. This hack also helps prevent accidental smudges or marks on other surfaces, such as furniture or flooring.

Avoiding Brush and Roller Marks With a Light Touch

Photo credit: impressiveinteriordesign.com

Achieving a smooth and flawless paint finish can be challenging, but using a light touch can prevent brush or roller marks from appearing on your surface. By applying gentle and even pressure when painting, you can avoid leaving noticeable streaks or lines that can ruin the final look of your project. When using a brush, make sure to use long and fluid strokes in the same direction as the grain or texture of the surface. For rollers, roll in a straight line and avoid pressing too hard, which can cause excess paint to gather and create uneven marks. Remember, using a light touch takes some practice, but it can make a big difference in the overall appearance of your paint job.

Less Mess with a Putty Knife

Photo credit: .thewirecutter.com

Painting can be messy, but a putty knife can be a helpful tool for removing excess paint from brushes and rollers. Instead of wiping the excess paint off on the side of the paint can, which can create a mess, use a putty knife to scrape the excess paint back into the can. This not only helps keep your work area clean but also ensures that you are not wasting paint. When using a putty knife, make sure to scrape gently to avoid damaging the bristles on your brushes or the nap on your rollers.

Achieving Even Paint Coverage with a “W” or “M” Pattern

Photo credit: Pinterest

Getting even paint coverage can be a challenge, but applying paint in a “W” or “M” pattern can help. This simple DIY hack ensures that the paint is spread evenly and helps prevent visible brush or roller marks. Start by loading your brush or roller with paint and then make the first stroke in the shape of a “W” or “M.” Then, fill in the shape by making a series of vertical strokes. This method helps to evenly distribute the paint and avoid any buildup that can cause uneven coverage. By repeating this technique, you can achieve a smooth and even finish on your project. So, next time you paint, try using a “W” or “M” pattern and enjoy a flawless result.

Create a Weathered Wood Finish with Rag and Sandpaper

Photo credit: angelamariemade.com

Adding a weathered wood gray finish to your furniture can create a rustic and charming look that is perfect for any home. To create a whitewash, mix a small amount of white paint with water. Apply it with a brush, making sure to wipe off any excess with a rag as you go. Once the whitewash has dried, apply a coat of stain over the entire surface, using a staining rag to work the stain into the wood. Then, rub over the white wash paint strokes with a staining rag or lint-free rag to smear the paint mixture into the wood. Finally, lightly distress the wood with sandpaper until you achieve the desired look. This technique is an easy way to distress wood with paint and create a unique, weathered gray finish.

Painting is a cost-effective and rewarding way to give your home a fresh new look. By following these tips and tricks, you can achieve a professional finish on your DIY home improvement painting projects. Remember to take your time, be patient, and don’t be afraid to experiment with different methods to find what works best for you. With a little bit of practice and know-how, you’ll be painting like a pro in no time!

Advertisement