Parents Swear By These Easy Crafts Using Materials You Already Have At Home

Shannon Quinn - March 22, 2023
Share

Looking for fun and engaging activities to keep your kids entertained? Look no further than your own home! With just a few simple materials that you likely already have lying around, you can create a whole host of kid-friendly crafts. These ideas will keep your little ones busy and happy for hours on end. Whether you’re looking to upcycle old materials, repurpose household items, or simply get creative with what you have on hand, there’s no shortage of ways to encourage your child’s imagination. Spark their love of crafting right from the comfort of your own home.

Credit: Reddit

DIY Easter Print Using Toilet Paper Rolls

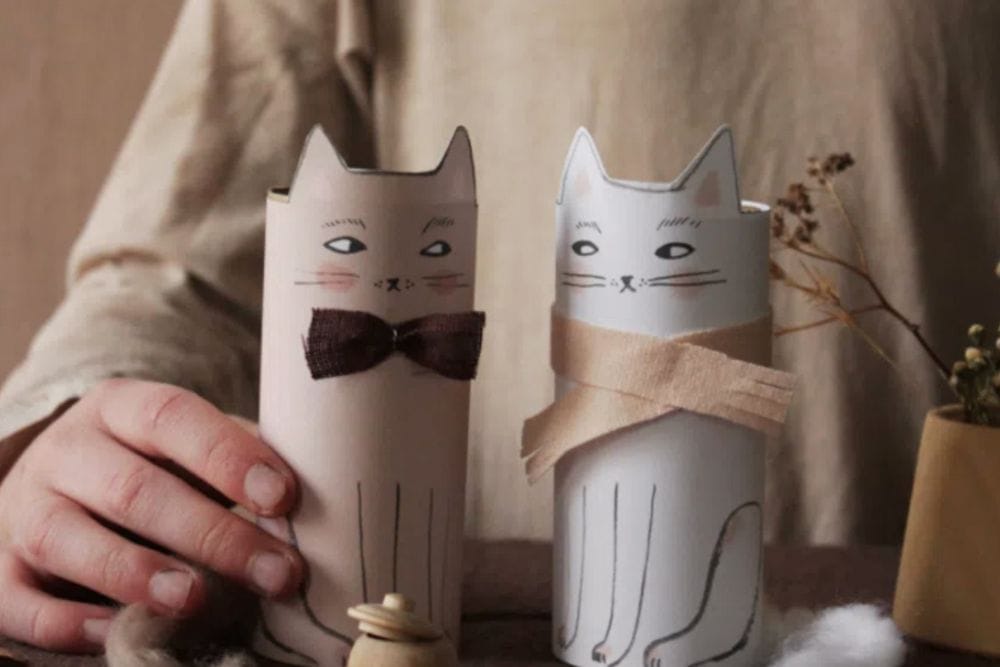
If you’re looking to do a cute Easter craft with your kids for spring, this one is quick and easy. Collect three toilet rolls to do this project. The first print you are going to be making is a baby chick. Dip it in yellow acrylic paint, and simply press the paint down onto a piece of brown paper. You can recycle brown paper bags from the grocery store, or buy a roll of brown paper from Dollar Tree. For the second print, bend the cardboard tube so that it is pointed at the top, like a rabbit’s ear. Grab the third tube and dip it into blue acrylic paint. Once your kids have pressed in the basic shape of the rabbit and the chick, you can go in with a pen to add the details like the eyes, beak, and whiskers.

Credit: Reddit

Food Coloring Flowers

This is a very quick and easy craft for you to do together with your kids. And if you have flowers growing in your garden, you might already have everything you need on your property. All you need to do is place some flowers into a glass that is filled with water and food coloring. Obviously, white flowers work the best, because their colors show up the most. But it will also work on flowers that already have color. Consider taking a before picture on your phone so that your kids can be reminded of what the flowers originally looked like. Leave it in the water overnight. In the morning, your flowers will have absorbed the food coloring into their petals. This is an especially good craft to do if you’re getting ready for a holiday. For example, maybe make some green flowers for St Patrick’s Day.

Credit: Reddit

Celery Stalk Flower Prints

Many of us eat celery every week. It’s a healthy and crunchy snack to give our kids. But when we cut the stock of celery, we always just end up throwing away the end piece that is inedible. Someone on Reddit came up with the brilliant idea of using the end of the celery stalk as a stamp. Let your kids add paint to the celery with a brush. It looks even cooler if you have multiple colors at once. Then, simply stamp it onto a piece of paper. The result makes a shape that looks sort of like a flower. Your kids might be satisfied just trying out the stamp a few times in different colors. But you could even take it to the next level by creating cards for their grandparents, wrapping paper, or other items made from their custom print.

Credit: Reddit

Paper SnowFlakes

One of the crafts that I remember making multiple times and Elementary School were paper snowflakes in the winter time. However, when you’re doing this freehand, the shapes just end up being a little wonky. There are actually several YouTube tutorials out there that teach you different snowflake patterns. And there are also books out there that will help you make specific patterns as well. This is a great craft to do with kids, because all you really need is some paper and child safe scissors. Once you’re done making multiple snowflakes, you can use Scotch tape to put them on your windows in the winter time.

Credit: Reddit

No Sew Easter Bunny Plush With an Odd Sock

Everyone has experienced the curse of the singular sock at least once in their life. We don’t know where those missing socks go, but we know that we’ll probably never see them again. This can be upsetting if you bought your kids really cute socks and a pattern that you don’t want to get rid of. So the next time you end up with an odd sock, consider making this craft with your kids. It’s actually very simple to make an Easter Bunny out of socks. All you need is a sock, scissors, some rice, ribbon, a Sharpie, and two rubber bands. These are all things that you most likely already have around the house. Or, they would be easy for you to acquire from the dollar store. For a full step-by-step tutorial on how to make this, check out the Mother of Grom Blog.

Credit: Reddit

Toilet Paper Roll Cats

Here is yet another adorable idea on how to make a craft out of toilet paper rolls. These cats are actually a free printable that you can download from Merma Blog. So the only supplies you need are a pair of scissors, toilet paper rolls, a glue stick, and a working printer. as you can see in the photo, this person has taken an extra step in the process by giving the cats little accessories like a scarf and bow tie. These were made by using small pieces of fabric that were most likely attached using a glue gun. If you don’t have the fabric or the glue gun on hand, you can just skip that step. Your kids won’t know the difference. And they would have a lot of fun playing with these new cat toys that are essentially free.

Credit: Shutterstock

Origami Paper Planes

One of the most old school crafts that nearly every kid has done at least once in their life is making a paper plane. So if your kids have not done this yet in school, you seriously need to teach them how to do this. Just make sure that you tell them not to do this in class, because they can get in trouble! In case you forgot how to fold a paper plane on your own, check out this YouTube tutorial. There are actually a lot of different folding techniques out there for different types of paper airplanes. Some might be more aerodynamic than others. But the great thing about this craft is that you most likely already have some blank printer paper at home. So this can be a free craft that your kids get to play with afterwards.

Credit: Toddler at Play

Paper Towel Tie Dye Art

Making tie dye shirts has been a staple craft project in summer camps across the world. However, it’s usually something that kids do when they’re a little bit older, since it can get messy. And there are some kids out there who never get the opportunity to go to summer camp at all. This paper towel tie dye project is perfect to do with toddlers, because it gives them the experience of making tie dye without the mess. All you need to make this project is a paper towel, a rubber band, markers, and a spray bottle filled with water. For a full step-by-step tutorial on how to do this project, check out the Toddler At Play blog.

Credit: Parent Map

Homemade Play-Doh

Buying Play-Doh for your kids is inexpensive. It costs $0.50 for a small tub at Walmart. However, we all know how Play-Doh can quickly get ruined. It dries out, mixes with colors and in a weird way, and it just generally needs to be thrown out after a certain point. Over at the Fun Learning For Kids Blog, they have a recipe for making homemade play-doh. All of the ingredients on the list are most likely already in your pantry. The good thing about making this at home is that you can choose your custom colors. We can’t always control what colors they have available at the store. So this would be a really fun project to do together with your kids in their favorite colors.

Credit: PBS

Make a DIY Board Game Out of Cardboard

Kids love to play board games. However, Maybe your kids have played the same game over and over again. Or, maybe you just don’t have it in the budget to purchase a new game right now. After all, some of those games out there cost as much as $50! So why not make your own board game? The game in the photo above was made using a piece of cardboard, acrylic paint, and small rocks for the game pieces. Your kids will feel really proud knowing that they made this game themselves, and they will probably want to play with their friends. Check out this article from PBS, where they give you step by step instructions on how to make a DIY board game for kids.

Credit: Reddit

Popsicle Stick Bird Feeder

A lot of people like to give their kids popsicles for dessert. Instead of tossing the sticks in the trash, start collecting them for this craft project. (These are also available for just $1.25 at Dollar Tree.) This photo came from an Instagram called Schmitt’s Creek Farmhouse. In the caption of the photo, she explains that her daughter fell in love with a bluebird that always visits their yard. She created her own design using popsicle sticks. They have all been colored by her daughter, which makes it a rainbow bird feeder. She says, “Shockingly, this was actually pretty easy. I used craft glue for most of it and then used a hot glue gun for a few of the top sections that I needed to dry quickly. This design did require a fair amount of popsicle sticks (tip: use the jumbo ones!)”

Credit: Mum in the Madhouse

Painted Rocks

If you grew up in the 90’s, odds are that you did this craft when you were a kid. Painting rocks is a very simple and straightforward craft. All you need to do is go out into your yard and find a rock for free. This is even easier if you already have a gravel driveway. If you live in an apartment, consider taking your kids to the nearest park and find rocks there instead. This obviously works better if you can find a rock with smooth, flat surfaces. Once the rock is done, you can put these in your planters just to add a little bit of happy decoration. For more rock painting ideas, check out the Mum in the Madhouse blog.

Credit: Kin Sights

Paper Plate Animals

A lot of moms out there buy paper plates, because it’s simply easier to serve your kids food when you don’t have to do a million loads of dishes every day. So if you already have some of these plain white cardboard plates on hand, consider making paper plate animals. As you can see in the photo above, someone came up with the idea of taking the top curve of a plate and turning it into a caterpillar. You would also need some construction paper, googly eyes, and painted q-tips. The dinosaur below was made with a paper plate and toilet roll. In the photo, it looks like they used acrylic paint to color their creations. However, you could just as easily use markers or even crayons on a project like this. For more ideas on paper plate animals, check out the First Palette blog.

Credit: Delia Creates

Balloon Farm Animals

Kids love balloons. If you have been out somewhere and walked past a balloon salesperson, you’ve probably already experienced your kids begging to have a balloon to bring home. So if you’re planning a party, or just so happen to have an extra bag of balloons hanging around, consider making these balloon farm animals. Check out the Delia Creates blog for a free printout of the eyes and other details that you need to attach to the balloons. The only downside to this craft idea is the fact that not everyone has helium in their home. However, you could still do this craft just by blowing air into a balloon. And they offer helium at Dollar Tree, if you buy your balloons there.

Credit: Shutterstock

Egg Carton Finger Puppets

At the time that I am writing this, the price of eggs has finally dropped from a ridiculous high in 2023. So, chances are that you have a carton of eggs at home. Before you recycle the packaging, consider cutting it up into these adorable little finger puppets. All you really need to make these are paints, and some googly eyes. They have also used a pen to give the monsters little mouths, and scrunched up paper to add to the top of their heads. Kids love to play pretend. So I can imagine getting several hours of entertainment out of this craft project. For more ideas on egg carton finger puppets, check out the Kids Soup blog.

Credit: 5 Minute Crafts

Cookie Cutter Painting

Most of us have cookie cutters in our kitchen drawers, especially if you have kids. They come in all different shapes and sizes. This is a great idea that came from 5 Minute Crafts. All you need to do is have your kids dip the cookie cutter into some paint, and press it onto paper. In this specific example, they painted a canvas blue, and let a little girl stamp some white stars with a cookie cutter. Then she splattered specks of white paint all over the canvas, and made a celestial work of art. You don’t have to go to that extent to do this craft at home. There is no need to buy a canvas. This can be done with any spare scrap paper that you might have around the house. For more ideas on cookie cutter painting, check out the Messy Little Monster blog.

Credit: Mod Podge Rocks Blog

Mod Podge Paper Mache Bowls

One of the most common crafts that I’ve seen in Girl Scout Troops and elementary school art classes is making a paper mache bowl. All you need to get started are a newspaper, ModPodge, balloons, plastic cups, a foam brush, scissors, and craft paint. Maybe you don’t have balloons on hand. So this could be a great craft to do after you throw a birthday party, and you happen to have a balloon on hand. Not going to lie. This craft can get a little bit messy. But the result is really cool. For a full step-by-step tutorial on how to make these, check out HGTV.

Credit: 5 Minute Crafts

Painted Leaf Art

The photo above came from a video that was done by the 5 Minute Crafts YouTube channel. In the video, they give this girl a large piece of construction paper. She paints the side of a leaf, and then uses it as a stamp on the paper. Then she uses a bundle of Q-tips to dab on the flowers of the lavender. The result is really cute, and you could easily replicate this craft at home using things that you already own. I can imagine also trying a version of this same project, only with different shapes of leaves. Experiment with what you have in your own backyard.

Credit: Shutterstock

Finger Painting

This craft is so simple and straightforward, it almost doesn’t even belong in the list. Your kids have most likely done finger painting before. Or, you have at least done the project where the kids will stamp their hand onto a piece of paper. However, I know a lot of parents who are afraid to do this at home, because they don’t want their kids to make a mess. So they leave it up to the art teachers to do a project like this. I would encourage you to try this at home, even if it means setting up a little table in your backyard. Kids love to get used to different textures, and express their creativity with their hands. This is especially true when they’re too young to have the motor skills to use a pencil or paint brush.

Credit: 5 Minute Crafts

Straw and Ink Tree Painting

Here is yet another art idea that came from 5 Minute Crafts. This starts out with a large piece of construction paper. The little girl pours a bit of black ink onto the paper. Then she gets a straw and blows air to push the ink across the page. This creates a shape that looks like a tree. She continues blowing in different directions, creating branches of the tree. Next, the girl uses q-tips dipped in paint to make the flowers, creating a cute cherry blossom tree. If you make this with your kids, try it out yourself first. Demonstrate it to your kids so that they understand how to blow in the right direction. I can see this being challenging for younger kids. But no matter how pretty it turns out to be, it will still be fun.

Credit: Mod Podge Rocks Blog

Tissue Paper Flowers

Most of you out there will have tissue paper on hand that you use for presents. You can actually reuse this tissue paper to make flowers. When I was a little girl, I first made crepe flowers with my girl scout troop. I fell in love with this craft, and my mom ended up buying me an entire book filled with crepe flower making ideas. It is a really fun and fulfilling craft to do, especially if your kids like flowers already. Check out the DIY Candy blog for more ideas and instructions on how to make crepe flowers in just 5 minutes.

Credit: 5 Minute Crafts

Fork Tulip Painting

Looking for a spring craft? Consider doing this fork painting from 5 Minute Crafts. As you can see in the photo, the stem of the flower was already painted before the little girl went in with a fork full of paint and pressed down to create a tulip. She later uses the fork to make blades of grass and other details in the painting. If you feel grossed out with the idea of your kids putting paint all over the forks that you eat with, consider using a plastic fork instead. you might already have some on hand, but you can also pick them up at your local restaurant the next time you go out to eat.

Credit: Mod Podge Rocks Blog

Make Spin Art With a Salad Spinner

Spin art is a new trend that has been going around the internet. The results are very cool, and it’s a lot of fun to make. But you don’t need a fancy spinning machine to get it done. You can accomplish this with a salad spinner. The obvious downside to painting with a salad spinner is that you get paint all over the thing that you use to make your salads. Just make sure that you are using non-toxic paint. I would personally try to clean this by hand, so that the paint doesn’t end up cycling through your dishwasher and onto your other dishes. Or, buy a plastic salad spinner from Ikea for $7 and just keep it separate from the one you use to eat. For step-by-step instructions on how to do this, check out the DIY Candy blog.

Credit: 5 Minute Crafts

Toilet Roll Flowers

This is yet another simple and straightforward painting project that was posted on the 5-minute crafts YouTube channel. As you can see from the photo, the girl starts out with her leaf press painting which we mentioned in a post above. But she also uses a toilet paper roll that has been cut into the shape of a flower. She dips this into the paint, and then uses it to create beautiful flowers on top of the stem. If it isn’t already very obvious by now, you should be saving your toilet paper rolls! There are so many ideas for crafts that you can make with these things.

Credit: 5 Minute Crafts

Bubble Wrap Beehive

We live in a culture where more and more people are getting deliveries from Amazon Prime at least once a week. So it’s not uncommon for people to have bubble wrap on hand in their house. You can recycle this bubble wrap by using it for this adorable beehive painting project. Depending on their age, your kids might need help from you to paint the little bumblebees that are stuck on to the painting at the very end. But most young kids can handle painting a tree, and painting the bubble wrap yellow. During this craft project, you could take the opportunity to explain to your kids why bees are so important to the environment.

Credit: Shutterstock

Fall Foliage Art

If you happen to be reading this list during the autumn, consider creating fall foliage art with your kids. All you really have to do is go outside and pick some of their favorite leaves. Acorns are also great, if you can find them. Once you have all of your foliage assembled, put them together into animal shapes and glue them onto a piece of paper. Here at Home Addict, we actually have an entire blog post called 25 Clever Ways to Use Autumn Leaves, which has tons of ideas for this project. Be sure to check that out once you’re done reading this list.

Credit: 5 Minute Crafts

Bubble Paint Art

This next craft is very easy, and the results are beautiful. All you need to do is fill a bowl with water, and mix in a little bit of dish soap. You also need to add some paint into the water and mix it up. Next, have your kids blow into a straw to create bubbles in the bowl. Make sure you leave enough room at the top of the bowl so that the water doesn’t overflow. Put a towel underneath or paper towels to catch any of the water that might splash over. Once the colored bubbles have risen, press a piece of paper down onto them. This creates a very cool pattern on the paper. Then you can make all sorts of things out of this paper. In the example above, they made cards and gift bags with this bubble painting technique.

Credit: Shutterstock

Popsicle Stick Easter Rabbits

Earlier on this list, we suggested making a bird feeder out of Popsicle sticks. So if you have some of those sticks left over, you might want to work on this project as well. This is a really simple and straightforward art project where popsicle sticks are glued together in the shape of a rabbit wearing a top hat. Then they used little pieces of construction paper for the ears, eyes, and other details. This would be a perfect craft to do around Easter. Or, just spring in general. You can also use this technique to turn popsicle sticks into almost any animal, not just a rabbit.

Credit: Mod Podge Rocks Blog

Wine Cork Stamps

The next you buy yourself a bottle of wine, make sure you set aside the corks for this cute project. Kids love to play with stamps, especially if they know that they helped make it themselves. This really only works for simple shapes like hearts and clovers. But that makes it perfect for Valentine’s Day and St. Patrick’s Day. Once the stamp has been created, you can press it down on a piece of paper and turn this into cards or wrapping paper. This can be a really sweet project for you and your kids to make and send to your loved ones. For instructions on how to make this, check out the DIY Candy blog.

Crayon Candles

When you have kids, it’s very common to have a lot of broken crayons. Some people have a difficult time letting those crayons go. My own mother still has a box of crayons left over from when we were kids, because she spent so much money buying them in the first place. A really good way to recycle these crayons is to turn them into candles. You can also use oils to turn these into a scented candle. For this project, you might have at least half of the materials at home, but you will probably have to pick up a few things from the craft store, like candle wicks. For step-by-step instructions on how to make this, check out the Pinning Mama Blog.

Credit: Shutterstock

Get Creative With Food Animals

Kids love to play with their food. And for picky eaters, making healthy food into animal shapes can sometimes encourage them to eat what’s good for them. On Pinterest, there is an entire category of images of “Animal Shaped Foods”. So there are hundreds of example images out there for you to choose from. You can do this together with your kids any day of the week. But this is also a really fun thing to do when you’re getting ready for a party. This past Halloween, I made hot dogs that were wrapped in pastry to make them look like mummies. With so many ideas to choose from, you can do this for pretty much any occasion.

Credit: Mod Podge Rocks Blog

Glue a Puzzle Together and Turn it Into Art

During lockdown, puzzles or selling out like never before. So if you happen to be one of those families that got into puzzles during the pandemic, consider gluing them together and making a piece of art. Once the puzzle has been framed, you can hang it on the wall and it serves a dual purpose. You will remember the time that you and your family spent together making the puzzle. And it also is a work of art. So the next time you buy a puzzle for your family, ask yourself if you like the image enough to hang on your wall. Here are step-by-step instructions on how to glue a puzzle from Bob Vila.

Credit: Shutterstock

Milk Carton City

Kids love to play with cars and build imaginary cities. If you have cardboard milk or broth cartons in your kitchen, set them aside before they go in the recycling bin. These little skyscrapers are actually very easy to make. All you really need to do is paint the carton white, and then use a Sharpie or a black paint to make the windows. I have seen a few examples of these on the internet, and some people choose to use construction paper for the windows and doors instead. Anything is fine. Just get creative with whatever materials you have on hand. For more instructions on how to make this craft, check out the My Teaching Station blog.

Credit: mod podge rocks blog

Pom Pom Garland

In the past few years, pom pom garland has become really popular. but when you go to stores like Michaels Crafts, they want to charge you a small fortune to buy it. It turns out that pom pom garland is actually really easy to make. and if you already have yarn and string on hand, you could get this done for free. I did this a few years ago, but I made the mistake of not wrapping it around something when I put it away for the year. Make sure that it doesn’t get tangled in storage. If you don’t want to make pom poms by hand, you can do this with pom poms that you find at the dollar store as well. For more instructions on how to make this craft, check out The Spruce.

Credit: Shutterstock

Flower Art on Cardboard

If you happen to be reading this in the spring and summer months, chances are that you have flowers around your property. And if you live in an apartment without a backyard, you probably have access to flowers in your local park or on a friend’s property. This is a really cute craft idea if it’s easy enough to just go in your own backyard. All you need is a piece of cardboard, paint or a sharpie, flowers, and some glue. I have seen a lot of examples of this on the internet, and it is interesting to see the ideas that people come up with. The possibilities are endless. For more instructions on how to make this craft, check out Hello, Wonderful.

Credit: Moms and Crafters

Pool Noodle Light Sabers

Kids absolutely love star wars. And ever since it was acquired by Disney a few years ago, they are coming out with more and more kid friendly shows for the franchise. So if you’re the mother of a little boy, chances are that he enjoys star wars. These pool noodle lightsabers are super easy to make. All you really need is a lightsaber, and two different colors of tea. If you don’t have an extra pool noodle on hand, these are available all year long at Dollar Tree. I have noticed that even though they are available all year long, they switch out the colors depending on the season. So be sure to keep checking in your local store if your kids want a specific color. For more instructions on how to create this project, check out the Moms and Crafters blog.

Credit: Adventure in a Box

Castles From Recycled Cardboard

Earlier on this list, we talked about making a little city out of milk cartons. But what about an entire castle? This is a really great idea utilizing multiple different containers that you probably recycle every week. Out of all the crafts on this list, this is probably the most detail oriented. And your kids are probably not going to be able to do this on their own. But the end result looks amazing. I can actually imagine adults wanting to do something like this for their Dungeons and Dragons campaigns. And kids would especially love to play with their toys in this cardboard castle. For more instructions on how to create this project, check out the Adventure in a Box blog.

Credit: Shutterstock

Let Your Kids Paint the Glass of a Window

There are some moms out there who would cringe at the idea of letting their kids paint on their window. However, it’s easier to clean than you might imagine. Kids instinctively want to paint on the walls and all over the house. I know I was guilty of it as a child. So this is a way to give your kids that freedom and a controlled environment. The end result can actually look really pretty, sort of like a stained glass window. I have seen people do this specifically for the holiday season. If they happen to be artistically inclined, they can paint characters for Christmas. Then they wipe the windows down after the new year has begun.

Advertisement