Easy DIY Projects That Can Be Done In An Hour

Shannon Quinn - December 31, 2019
Share

So many people love to do DIY Projects at home, because it can help them save money, and they also love the feeling of accomplishment that comes with making something on your own. However, there is only so much time in a day. With work, school, errands, and taking care of kids, there might be very few hours left in a day for you to relax and enjoy yourself. That’s why we have gathered a collection of DIY projects that will take just one hour or less to complete. Since this is such an extensive list, we will not have time to give the step-by-step instructions to every project. This is simply meant to inspire you with the options of what you can accomplish in a short amount of time.

Using chalk paint on jars gives them a very stylish look. Credit: Shutterstock

50. Painted Mason Jars

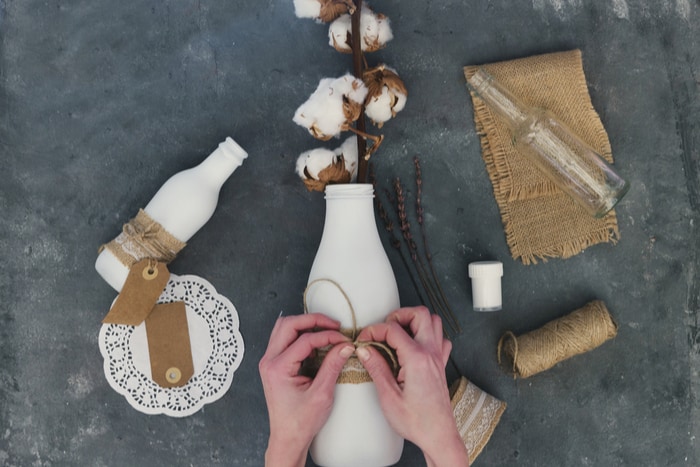
Ever since the rise in popularity of farmhouse decor, painted mason jars have appeared on Etsy in all shapes and sizes. They have been made into flower vases, sconces, centerpieces, and even soap dispensers. While some people spend their money buying these at craft shows, they are actually very easy to make!

Painted jars are so popular, they are sold on Etsy. Credit: Curious Carrie on Etsy

Walmart sells 10-packs of mason jars for just $10. If you do not have a Walmart nearby, most large grocery stores will sell them in the same aisle where you would find aluminum foil and saran wrap. (You don’t necessarily have to use Mason jars, either. Any glass containers will do.) Next, you need to buy some chalk finish paint. These come in various colors, and they always dry with a matte pastel finish. Be sure to lay out some newspaper before you paint over top of the jars. Allow them to dry, and voila! You have an adorable farmhouse decor piece for your home.

You and your kids will love decorating ceramic ornaments. Credit: Shutterstock

49. Ornaments Out of Modeling Clay

Whether you are preparing for the holiday season, or you just like hanging little ornaments around the house, you might want to create something out of modeling clay. You can buy blocks of modeling clay online, or at any craft store. If you want to avoid baking the clay to make it harden, be sure to buy air dry clay instead. This can be an amazing craft to do together with your kids, because they will be proud to know that they helped make an ornament.

Even a simple flower pattern can look cute on a tree. Credit: Shutterstock

Just like play dough, you can shape your modeling clay into anything you like. Some people also like to roll out sheets of clay and use cookie cutters to press and remove shapes. Be sure to leave a hole for a string that will go in later. Once the ornaments have dried, you can paint them. Depending on the type of dough you buy, you may have to bake them a second time. Always be sure to read the instructions, and find a YouTube tutorial to watch examples.

It is easy to make a flower wreath with products from the craft store. Credit: Shutterstock

48. Faux Flower Wreath

When you walk through Target and Home Goods in the spring, you have probably seen beautiful flower wreaths for sale. These typically cost between $20 to $30 each when you buy them in the store. But you could actually buy a few supplies from your local Dollar Tree or craft store and make a flower wreath at home in under an hour.

You can tie wild flowers to a grave vine wreath. Credit: Shutterstock

In order to make a flower wreath, you will need a wreath ring, faux flowers, wire cutters, and a glue gun. It could be as easy as sticking the flowers into a foam wreath ring, and they stay in place. Alternately, if you are making this in the spring or summer, you could get some flowers from your own garden. These can be tied to a grapevine wreath. There are tutorials on YouTube for flower wreaths, so it’s best to find a video to help you depending on what materials you are working with.

These geode coasters can be made with resin. Credit: Shutterstock

47. Coasters

If you have expensive furniture, you will want to protect the wood from rings by putting down a drink. Coasters can help to prevent your furniture from being damaged, and they are easy to make. There are a lot of different types of coasters out there. You can buy unfinished cork, wooden squares, tiles, or pretty much any material you choose. Customize with photos of your family, paint, or pretty much anything you want.

You can decorate simple cork coasters. Credit: Shutterstock

These homemade coasters make great gifts to give your friends. If you search “DIY Coasters” on YouTube, you will see that there is a huge list of options. There are even tutorials on how to make those gorgeous geode coasters that are very trendy right now. All of the options usually take under an hour to complete, and they are very affordable.

You can tie knots to hang a glass with a candle. Credit: Shutterstock

46. Macrame Knotted Hanging Bottle Holder

The art of macrame seems complicated, but it is really just tying knots in string over and over again. One of the easier beginner macrame projects is to make a plant hanger. These look really trendy, and can be a beautifully stylish way to display your potted plants throughout your home. And once you buy a pack of rings and a roll of string, you can make as many as you want. There are also full kits that you can buy online or in the craft store that has everything you need, as well as instructions for multiple patterns.

There are several different ways to make a macrame hanging plant. Credit: Shutterstock

If you need a bit of help learning how to Macrame, check out this video tutorial by Rachel Colton. The video is just 17 minutes long, but she cuts out some of the lengthy knotting process. The amount of time it takes you to finish this project will be different depending on how skilled you are. But once you get going, it becomes very therapeutic to work with your hands. It can be done while you watch a good show on Netflix, or listen to music or a podcast.

You can arrange your dried flowers in an intricate pattern. Credit: Shutterstock

45. Dried Flower Artwork

This list is full of DIY projects that only take an hour. Technically, you need to have your flowers dried long ahead of time before you get started with this project. You can press flowers in wax paper and leave it in between the pages of a hardcover book. This takes only a few minutes, but you have to let them dry inside of the book for two to three weeks.

Some people like to use a paper backing to display their flowers and leaves. Credit: Shutterstock

Once your flowers are dried, you can start to place them into a double-sided glass plate picture frame. (Sometimes they are called “floating frames”.) Close the frame, and you’re done! It’s very quick and easy to do this DIY project. When it’s done, these look beautiful, and it’s a great way to bring your garden outdoors into your indoor living space.

Hanging terrariums are very trendy right now. Credit: Shutterstock

44. Hanging Terrariums

If you are really into interior design, you may have seen hanging terrariums in modern homes. These are a great way to incorporate plants into your home. This works especially well with succulents, because they are small, and do not need a lot of water to survive. They usually cost only $2 to $3 each at the Home Depot garden center.

Assembling your terrarium should only take a few minutes. Credit: Shutterstock

In select locations, you can find hanging terrariums at your local Dollar Tree. Otherwise, you will have to find them at a craft store, or buy them online. Next, you need your plants, some potting soil, twine, and rocks. You can always look on Pinterest for inspiration as to what style of terrarium and plants you are looking for. There are also plenty of tutorial videos on YouTube if you feel that you need help making these.

It is fun and easy to make slime at home. Credit: Shutterstock

43. Slime

In 2019, one of the top trending video topics on YouTube was DIY slime. People went crazy buying kits online so that they could make it with their kids. You can buy slime kits online, or gather the ingredients from around your house. Some people just use glue and borax, which you might already have in your house. There are a few different slime recipes out there, but they all only take a few minutes to assemble and get to a consistency where it’s ready to play with. Before you get started, make sure you find a good tutorial to follow online.

You can put glitter and beads in home made slime. Credit: Shutterstock

For those who have made it, they say that making slime brings them back to their childhood. It feels good, and is sort of therapeutic to play with. There is probably a very good reason why it was trending. Once you are done making the slime, it can be put away in a container and played with again later.

Bling up a pair of shoes with rhinestones. Credit: Shutterstock

42. Rhinestone Shoes

Need a little bit more bling in your life? Then try making some rhinestone shoes. All you really need are some rhinestones, a hot glue gun, and a pair of shoes that you want to decorate. It is just a matter of gluing the rhinestones to your shoes. Press down, and make sure they will not fall off of the shoe. After it dries, you should be ready to go. Of course, you cannot put these through the washing machine or get them wet, because they might fall off.

This pair of flats has rhinestones gathered near the front of the shoe. Credit: Shutterstock

Looking for style inspiration? Gucci has rhinestone shoes for $1,250. You could easily make something that looks very similar, and spend a lot less money. If you are looking to make something even more luxurious than something you find in a craft store, you can be Swarovski crystals in bulk.

It is easy to sew patches to a pair of jeans. Credit: Shutterstock

41. Patched Jeans

Patches are very trendy right now, especially with brands like Gucci that are selling embroidered jackets for $6,500. It is actually very easy to sew or iron your own patches onto jeans, and it only takes a few minutes. First, you should buy a collection of patches. They are at any craft store, or you can find multi-packs of random objects online. You can even find patches inspired by Gucci, which could help you get the look you want for a lot less.

Patches come in all shapes and sizes, and can easily be found online or at a craft store. Credit: Shutterstock

Some patches come with a dried glue on the back. This is easy for you to iron, which makes the glue melt and stick to the fabric underneath. This is much easier than sewing, but you need to be ready to commit to never being able to use that piece of clothing for anything else. If you have never sewed with a needle and thread before, as someone in your family to teach you, or watch a tutorial online. It is very easy, and you should be able to customize a pair of jeans or a denim jacket in an hour.

All you need is a sharpie to make these milk carton houses. Credit: Shutterstock

40. Milk Carton Skyscrapers

Kids love playing with toys, but really young children have absolutely no concept of how much things cost. When you make toys by hand, they will be just as thrilled to use them when they play. This is why making houses from cartons can be a perfect DIY project for parents.

These cartons were painted white before being drawn on. Credit: Shutterstock

All you need to do is gather your leftover drink cartons. Paint them white, and allow it to dry. Then, get a sharpie and begin to draw skyscrapers and houses on the sides of the cartons. As you can see from the photos, this actually looks very cute. You could make an entire city for your kids to drive their toy cars around in.

These soda bottles have been up-cycled into adorable cat containers. Credit: Shutterstock

39. Soda Bottle Planters

In the United States, pretty much every family has at least one 2-liter plastic soda bottle in their house. Normally, these are thrown in the trash or recycling bin without a second thought. If you have kids, you may want to consider making them into DIY planters. This can become a valuable lesson to teach your children about recycling and sustainability. All you need to get started are a pair of scissors, paint, and a sharpie.

This succulent fits snuggly into a bear container. Credit: Shutterstock

Cut the bottle in half, and cut the plastic so that it has ears like a bear, cat, or dog. Paint the outside of the bottle, and use a sharpie to draw on the face of the animal. Plants need to drain the water from the bottom of their planters, so you will also want to poke holes into the “feet” of the bottle.

These bird houses have been hand painted with love. Credit: Shutterstock

38. Paint A Bird House

Building a birdhouse from scratch would take much longer than an hour, and it takes some skill from someone who at least took a wood shop class in High School. Lucky for you, they sell ready-made bird houses. So all you have to do is paint them with acrylic paints, allow them to dry, and you’re done. Once you hang them in your yard, birds will begin to build their nests there, and get shelter from the rain and cold.

You can buy additional accessories at the craft store to glue onto your bird house. Credit: Shutterstock

The amount of time this DIY project takes will depend on how skilled you are at painting. Some people want to go above and beyond to give their birdhouses little accessories like a welcome sign, gardening tools, and even a front porch. These can be found at places like Michael’s Crafts and Hobby Lobby, and attached with a hot glue gun.

Spray painting a chair is one of the easiest ways to add color. Credit: Shutterstock

37. Paint a Chair

An easy DIY project is to find an old piece of wooden furniture at the thrift store and re-paint it to match your home. If you are looking to make your furniture look like a matte pastel color, try using chalk paint. This is perfect if you’re trying to go for a farmhouse or shaggy chic style. Remember to sand your wooden chair first, and remove all of the upholstery before you get started.

For intricate details, you may want to hand-paint a chair. Credit: Shutterstock

Or, you could go for a more vibrant color with spray paint. They even make gold and silver sprays at Walmart for just $3 per can. If you are spray painting, remember to take your furniture outside, and wear clothes that you wouldn’t mind getting stained or dirty. The fumes are very strong, and it gets everywhere. You may also want to lay down newspaper to protect the grass, driveway, or porch.

These bottles have been wrapped in twine and burlap. Credit: Shutterstock

36. Burlap Vases

If you are going for a country farmhouse look, it is very easy to make burlap vases. Some people also combine this with painting the bottles in chalk paint, which we mentioned earlier in this post. All you really need to get this done is some burlap ribbon, twine, and a glass bottle. You can find most of these materials at your local Dollar Tree, so it should be very affordable.

It is easy to assemble burlap centerpieces. Credit: Shutterstock

This project is very easy and cheap to make in bulk. Most people try to go for this look when they are planning a wedding. It is perfect for a centerpiece with some sprigs of cotton or flowers. Or, you could always make some variation of this as a centerpiece on your kitchen island.

Some people like to add dried flowers to their home made soaps. Credit: Shutterstock

35. Handmade Soap

For years, people were making soap by hand. There are a lot of different ways to make soap, ranging from beeswax to animal fat. If you are not sure how to get started, you can always buy a soap-making kit online that gives you absolutely everything you need. Once you have the molds and tools, you can always make it again. And after you get used to making soap, it becomes easy to buy additional essential oils, dried flowers, and anything else that you want to put inside.

It’s easy to make soap with just a few natural ingredients. Credit: Shutterstock

This is a great gift to give to your family and friends. They will likely be very impressed that you were able to make your own soap. Some people wrap up their bars of soap in wax paper and wrap it with twine. You could even print your own stickers to use as a label.

You can make home made toothpaste with coconut oil, baking soda, and mint extract. Credit: Shutterstock

34. Natural Toothpaste

In recent years, people have become more aware of the fact that certain products have been made with harmful chemicals. making natural toothpaste is actually easier than you might think. All you need is some coconut oil and baking soda. If you want to add flavor, you could buy some mint oil, or find any other flavored oil in the baking section of your grocery store. This only takes a few minutes, and you can save yourself a trip to the grocery store when you run out of toothpaste.

Using natural baking soda can help your teeth stay healthy. Credit: Shutterstock

Once the toothpaste mixture has been made, be sure to put it away in a sealed air-tight container. When it is time to brush your teeth, you dip your toothbrush into the container. This is why many families will buy containers in bulk so that every person has their own personal toothpaste to use.

A chalkboard wall opens up the possibility to be creative. Credit: Shutterstock

33. Chalkboard Wall

Before the age of dry erase boards, every school in America had a chalkboard. If you are of a certain age, you probably remember walking up to the front of the classroom to use the chalk to write the answers on the board. Making a chalkboard is actually a lot easier than you would imagine. All you need is some black chalkboard paint, and a flat wooden surface. You can make your own chalkboard out of an old picture frame, or simply paint a section of a wall in your home.

Use your chalkboard wall to remind you of important tasks. Credit: Shutterstock

Once you have a black chalkboard wall, you can use it any way you want. if you are artistically talented, you can use liquid chalk markers to create a mural. Or, if you are just a regular person, you may want to use it for a to-do list or the menu for the night, so that everyone in your family can stop asking, “What’s for dinner?”. Some people find it helpful to have a chalkboard wall because it gives them a very large place in their home to see all of their tasks in front of them for the day. It is hard to ignore your responsibilities when they are written in huge text on the walls.

Flower crowns are popular in Mexico, and they are worn on special occasions. Credit: Shutterstock

32. Flower Crowns

In Mexico, flower crowns are traditionally worn during celebrations. Other parts of the world have adopted this beautiful tradition, and made it a part of the party culture. These would look beautiful during a wedding, or a birthday party in the spring or summer. It is actually easy to make your own flower crowns.

It is easy to make your own flower crown or tiara. Credit: Shutterstock

If you buy plain headbands, you could simply tie a few faux flowers around it, and make it more like a tiara. But if you want to have a fuller crown, you will need to buy faux flowers, and a wide headband. Use a glue gun to attach the flowers. It should take around an hour to get everything finished, and you can go on to have an Instagram photo shoot.

Use transluscent paint for these jars. Credit: Shutterstock

31. Mason Jar Tea Light Holder

Earlier in this list, we already mentioned painting mason jars with chalk paint. This will make it solid, so you can’t see through. That sort of paint doesn’t exactly make the best tea light holder. This is why some people will use a more translucent paint to color a mason jar. You can also get some squeeze paint to create designs and make them into Moroccan-inspired lanterns.

These jars look beautiful when painted with a Moroccan inspired pattern. Credit: Shutterstock

These tea light holders make a beautiful centerpiece at a large party or a wedding. If you want to reuse these glass jars later, make sure you light a tea light instead of a small candle. Small votive candles will melt down and get stuck to the bottom of the jars. This is very difficult to remove. Tea lights can be bought in bulk from places like Walmart, Ikea, or Amazon. Could also buy battery powered tea lights and completely skip using real candles as well.

Succulants are the perfect plants to put in small concrete planters. Credit: Shutterstock

30. Concrete Planters

If you read a lot of interior design magazines, you may have seen that concrete is trending in a big way, especially among people who want to have a modern industrial style home. People are having expensive concrete coffee tables, and even containers for their plants. Even a very small concrete planter can cost $20, with larger ones going for $100 or more. Many people think that this is worth paying for, since it gives an edge to their living space.

These little planters were made with love. Credit: Shutterstock

Believe it or not, it is actually very easy and cheap to make a concrete planter at home. First, you need to create a plastic mold for the concrete to go in. Once the mold is stable, you mix the “Quickcrete” concrete with water in a container, and pour it inside. Allow it to set and dry for 3 to 5 days. If this sounds like a project you would be interested in trying, check out this video tutorial by Timber & Tea.

These old drawers are being reused as planters. Credit: Shutterstock

29. Drawer Flower Beds

If you were considering making raised flower beds in your garden, maybe you watched a few tutorial videos and realized that you do not have the technical skills to cut wood and create the project you were hoping for. A great alternative to this is to simply reuse drawers from an old piece of furniture. You could fill the shelves up with dirt, and plant what you like. It also allows you to stack the drawers so that it goes vertical, or choose to place them on the ground side-to-side.

These drawers were repurposed on a shelving unit for an outdoor garden. Credit: Pinterest

We do not recommend using a piece of furniture you actually use! Leaving wood outside to get rained on will mean that it begins to take on water damage. This is fine for the plants, but not so much if you ever wanted to use the dresser again. We recommend finding a free piece of furniture from Craigslist, or find something very cheap from a local Goodwill or Salvation Army ReStore.

This adorable alpaca pinata was easy to assemble. Credit: Shutterstock

28. Mini Pinatas

Pinatas are so much fun at birthday parties. Kids love to see their favorite characters in paper form, just before they smash them open to get candy. Buying a pinata at the store can sometimes be expensive, especially if you are buying one that is very large. It is actually easy to make them at home, especially if you are willing to make a miniature version. If you get a lot of Amazon Prime deliveries to your house, or your family eats a lot of cereal, you might have some old boxes lying around that could be put to good use. You will have to cut cardboard in the shape of the character you are trying to make, and add colorful tissue paper to decorate the outside.

The inner shell of a pinata is made of cardboard. Credit: Shutterstock

Planning to use these at your next party? Then you might as well fill them with toys and candy before you glue it together. If this sounds too difficult and time-consuming, there are actually starter kits online that you can buy that come with all the materials you need to build miniature pinatas. If you are interested to know more about how they are made, check out the tutorial on Youtube by Kawaii Sweet World. She includes some printable patterns for you to make them at home.

This adorable little ice cream pop is made out of felt. Credit: Shutterstock

27. Mini Felt Plush Toys

Kids love to play with toys, but they can become expensive. And after a while, they begin to take up so much space in the house that we are not sure what to do with them all. If you want to make a craft that doubles as a toy, consider sewing miniature felt plushies. Even if you are not very experienced and sewing, this can be a great project for beginners. All you need are colored pieces of felt, a needle and thread with a color that matches, and cotton stuffing.

You can cut out shapes from felt to make little animal plushes. Credit: Shutterstock

On Pinterest, there are hundreds of free printable patterns for making mini felt plush toys. Draw the outline of whatever you want to make, and cut out two identical pieces for the front and back. You can sew the two pieces together, leaving a tiny slit open to put the stuffing inside. Add the extra pieces like wings, eyes, and anything else to the outside either via glue gun, or sewing.

Macrame can be beautifully intricate. Credit: Shutterstock

26. Macrame Wall Hanging

In nearly every beachy bohemian home, you will probably see a macrame wall hanging somewhere. Earlier on this list, we already mentioned making macrame plant hangers. Once you get used to creating macrame knots, you might want to go to the next level of creating an entire wall hanging. Depending on your skills, this may take longer than an hour. But if you are already experienced in it, it may only take you an hour to get this done.

Macrame is the art of tying knots into rope. Credit: Shutterstock

If you have never done macrame before, you can buy a starter kit that will give you everything you need to make a wall hanging. But once you get more experience, all you need are the hoops or a stick, as well as a large roll of macrame cord. When you search online, there are loads of free patterns and video tutorials on YouTube available to help you.

Bracelets are an easy task for jewelry makers. Credit: Shutterstock

25. Beaded Bracelets

If you are interested in getting started jewelry making, beaded bracelets are some of the easiest things that you can create. When you were a kid, you may have gotten one of those beaded bracelet kits to spell out all of your best friend’s names. As an adult, you can elevate that same craft by using high-quality glass beads that you find at the craft store.

You could make bracelets for all of your friends. Credit: Shutterstock

In order to make bracelets and necklaces, you will need elastic string, clasps, and jewelry making tools. They are available at most craft stores, or you can get a starter kit online. Next, you have to pick what beads and charms you want to buy. Instead of buying individual beads, it is usually cheaper to buy an assortment and use what you get in the lot.

Acrylic pour paintings look magical when they are done. Credit: Shutterstock

24. Acrylic Pour Painting

One of my favorite DIY projects is acrylic pour art. This creates a unique wave pattern with multiple colors of paint, and the result looks similar to marble. No two pieces of acrylic pour art look the same. This is one of those craft projects where you could have a lot of fun doing this as an adult. If you want to do this project with kids, you may need to get the supplies ready for them ahead of time. But once everything is laid out, they should be able to do this and have a blast, as well.

You need to mix your paint colors with a thinner to help it pour. Credit: Shutterstock

Before you get started, I highly recommend watching this video by Safiya Nygard. All you need is a blank canvas, pouring medium, plastic cups, and various colors of acrylic paint. I also recommend using pairs of disposable gloves and a disposable table cloth. If at all possible, do this outside, because you don’t want paint to pour all over your floors. I’ve done this craft multiple times, and it’s a ton of fun. All of the items you need can be found at Dollar Tree, but I recommend buying multi-packs of larger canvases from somewhere like Hobby Lobby.

These high top shoes are painted with cherry blossoms. Credit: Shutterstock

23. Painted Canvas Shoes

Custom shoes are all the rage among sneaker fans. It is actually very easy for you to get whatever design you could possibly want on a sneaker. All you need is a pair of white canvas shoes, and some acrylic paint. You may also want a spray sealant if you want the shoes to be shiny afterwards.

These slip-on sneakers are painted with roses. Credit: Shutterstock

If you are not artistically talented, you can always buy stencils to help you make the shapes that you want. Remember that with white shoes, they are not very forgiving if you make a mistake. So even though we put this in a list of crafts you can do in an hour, make sure you take your time so that you don’t end up ruining your artwork!

A group of tie dye shirts hanging out to dry in the sunshine. Credit: Shutterstock

22. Tie Dye Shirts

Anyone who has been to summer camp has probably experienced making a tie dye shirt. In order to get started, you need to buy a pack of white t-shirts. It is wise to get them in size extra large, just to make sure that everyone can fit into these shirts. The easiest way to get your project done is to buy a tie dye kit, since it will have everything you need like gloves, string, and a variety of colors.

These shirts have been tied and dyed by hand. Credit: Shutterstock

If you have never done this before, you may want to watch a tutorial video on YouTube first. There are a few different techniques on how to do this, depending on the design you are hoping to make. If you want to create a swirl pattern, you have to tie up your t-shirt, and intersect rubber bands so that they look like a cut pizza. Then, squeeze bottles of dye onto each section of the t-shirt. It should only take around 10 minutes to do this. Once the shirt is fully covered, you should cover it in saran wrap for 6-8 hours if you want it to be as dark and vibrant as possible. Some people choose to hang-dry their shirts immediately on a clothesline.

These small reclaimed wood signs are easy to make. Credit: Shutterstock

21. A Reclaimed Wood Sign

If you love farmhouse country decor, then you already know how popular reclaimed wood signs are. Believe it or not, you can actually buy reclaimed barnwood on Amazon in bulk. Once you have the wood planks in your home, you can take some paint and create whatever you want. If you are artistically talented, you could hand scroll some words onto the sign. Or, you could always buy a stencil so that you know the design or text that you want is perfect every time.

Some people like to create a wooden sign with a 3D effect. Credit: Shutterstock

Another option besides painting is nailing words into a wooden board. Then, you can take some string and wrap it around the nails to form the letters. This gives a 3D effect and it looks very cool. The only problem is that you may need some basic tools to get started. No matter what method you choose, this project should only take a few minutes, and you should be able to make multiples if you are looking to create gifts for your friends and family.

This backyard tic tac toe is great for parties or playing outside. Credit: HGTV

20. Outdoor Tic Tac Toe

Now more than ever, people are staying home and encouraging their children to play in their own backyard. Kids can get bored of playing the same games over and over again, so it would be a good idea to create DIY games. A giant Tic-Tac-Toe game is perfect for keeping young children entertained with at least 2 kids at a time. All you need is 9 hula hoops, which you can buy from Dollar Tree at $1 each. You can choose to keep these hula hoops the same color as when you bought them from the store, or spend some extra time decorating them.

This person used painter’s tape and spray paint to create the X’s and O’s. Credit: HGTV

Next, you need 6 circular pizza pans or large plastic plates. Create the X’s and O’s using either painter’s tape, paint, or draw them on with a Sharpie. Once the discs have dried, kids can toss the X and O pans into the hula hoops almost like a frisbee. When children are very young, they genuinely need help figuring out how to win Tic-Tac-Toe. But as they grow older, you could make the game a bit more challenging by asking them to stay far away from the hula hoops, and try to toss their X or O into the spot they want. If they miss, they may lose the game. So this encourages them to aim and strategize in order to win. For a full tutorial on how to make this, check out HGTV.

When you make your own candles, have as many as you want. Credit: Garden Therapy

19. Make Your Own Citronella Candles

Anyone who spends a lot of time outside in the spring and summer is already familiar with being plagued by mosquitoes. This is especially true if you live near a body of water like a lake or wetlands. Citronella candles are great for keeping bugs away. However, they get burned up very quickly, and they’re often too expensive to have multiple candles around the yard. That’s why it would be a great idea to make your own citronella candles so that you can have as many as you want. If you want to see the full tutorial from Garden Therapy, click here.

Recycle old cans to make these candles. Credit: Garden Therapy

In the blog, you’ll see that they use leftover tin cans. This is a perfect way to recycle the canned food you’re already eating, and create a ton of candles at once. Citronella candles are great for keeping bugs away from you, but they’re not going to eliminate them completely. This past summer, my family was spending a lot more time in our backyard than we ever had before. So I also learned how to make mosquito repellent at home that can be spread around the property. This stops the mosquito eggs from growing in the first place.

You can create any shape you want out of a potato. Credit: Shutterstock

18. Potato Stamp Wrapping Paper

During the holiday season, you might be looking for some crafts to do with your kids that encourage them to give to others. Besides going shopping or creating gifts for family and friends, you can also teach them how to make customized wrapping paper with potato stamps. All you need to do to create a potato stamp is to cut a potato in half. Use a knife to carve out the shape that you desire. Obviously, adults will need to do this part of the project. If you do a quick search on Google or Pinterest, you’ll see dozens of clever potato stamp designs that people have made.

This is adorable Valentine’s Day wrapping paper. Credit: Shutterstock

Once the potato stamp has been created, you can hand it off to your child so that they can use this for decorating a recycled brown paper bag. Dollar Tree also sells rolls of plain brown paper in their party section. Older children could potentially use a sharpie to draw the pattern they want before handing it off to the adult to help them cut out the shape. Since the potato already has natural moisture, you won’t need to worry about wetting an ink pad. If you don’t have an ink pad on hand, could also use a small tray of paint. For multi-colored stamps, use a paint brush to add the paint directly to the potato before pressing it onto paper.

Print a pattern from the Internet to make masks. Credit: Shutterstock

17. Cotton Face Covering

If you own a sewing machine, it only takes around 10 minutes to create your own cotton face covering. One of the most popular mask patterns and instructions are available for free on the Jo-Ann Fabrics website, and it comes in multiple sizes for babies, children, and adults. These can be made with leftover pieces of fabric you have lying around the house, or you can have fun customizing with your favorite patterns on fabric you buy from the store. If you don’t have a fabric shop nearby, Walmart has pre-cut pieces of fabric for $2-5 per pack. This is enough fabric to make a several masks, so each one will be $1-2 each after you account for interfacing and elastic.

If you have a sewing machine, it’s easy to make face masks. Credit: Shutterstock

Keep in mind that fabric masks don’t fully protect you from viruses. You need to put a filter inside of these in order to get full protection. In the beginning of the crisis, my mom and I created dozens of fabric masks for our family and friends, because there was nothing else available in stores. However, we eventually stopped using them once we had access to medical grade masks. Personally, I reserve fabric masks for a scenario where it might not even be necessary for me to wear a mask at all, like being outdoors at the park.

This person used leftover paints to decorate their Easter eggs. Credit: Shutterstock

16. Floral Easter Eggs

Decorating Easter eggs is an annual tradition in many households. There are dye kits available in stores in the spring where you simply drop a tablet into vinegar. But dying eggs in solid colors isn’t very original, and it’s something your kids have probably done in the past. Consider hand-painting flowers and other patterns on your eggs, instead. This creates something completely unique, and it echoes many of the old traditions from your ancestors. An egg carton can be used to help the paint dry.


Use an egg carton to help dry the eggs after decorating them. Credit: Shutterstock

In these photos, you can see that this person used the leftover paint they had lying around from a paint-by-numbers. All they did was create little dots in the form of flowers, and it looks amazing, because it was all a part of the same paint palette. If you enjoy crafting, you most likely have similar leftover paints from other projects. This is an amazing way to recycle art supplies you might already have around the house. Just remember to hard boil the eggs first, because you don’t want them to crack!

Be sure to wear gloves and be careful when making bath bombs. Credit: Shutterstock

15. Use Plastic Toys to Make Surprise Bath Bombs For Kids

A couple years ago, bath bombs were all the rage with grown ups. You might still love a good bath bomb from Lush, especially if you want to relax and enjoy some self-care. However, some parents save these for special occasions. But it’s actually pretty easy to make your own bath bombs if you purchase a kit online. Once you have the plastic pieces that bring the bath bombs together, you can put surprises inside just like what you find at Lush.

Kids love the colors and bubbles created by bath bombs. Credit: Shutterstock

A blog called Best Ideas for Kids gives a step-by-step tutorial on how to make bath bombs at home. On their blog, they have a Shopkin toy hiding inside. But you can create bath bombs with rubber ducks or any other kind of plastic toy that wouldn’t get ruined in water. Please keep in mind that adults should make these, because the ingredients contain chemicals that may be harmful if a child ingests it or gets it in their eyes. But your kids can still help stir together the ingredients and pick colors.

Use your recycled CD’s for crafting purposes. Credit: Shutterstock

14. Make Fish Out of Recycled CD’s

Looking to declutter your house? This next craft is a clever way to use junk you have lying around and transform it into a craft that your kids would love to use as a toy. Most of us have leftover CDs and DVDs in the house that we are never going to use again. For example, I have a tower of blank CDs that I once used to make mp3 playlists for my friends to play in my car stereo. Realistically, I’m never going to use them again, because I upgraded to Spotify and a bluetooth car stereo.

Your kids will have fun making these fish crafts. Credit: Shutterstock


A lot of you out there might have something similar. Instead of throwing those CD’s in the garbage, recycle those old CD’s into fish. All you need is a CD, a permanent marker, and colorful construction paper. Use the marker to draw scales on the shiny side of the CD. Then, cut out pieces of construction paper to create the fins. Voila! You have a cute shiny fish in less than an hour. If you like, you could also create some objects to go in their surrounding area, like the green seaweed made from construction paper shown above.

This illustration suggests putting a string of lights inside of the hula hoop tent. Credit: Wiki How

13. Make a Hula Hoop Tent for Kids

Kids love to be inside of tents, because it makes them feel like they have their own cozy little hideaway. When you were a kid, you most likely made blanket forts on furniture inside of your house. This was fun, but after a couple hours, your parents made you put all of the blankets away. What if your kids could have a blanket tent hanging somewhere all the time? They would be so excited, and it would give them happy memories for the rest of their life.

This sheer curtain was transformed into a lovely little tent. Credit: Shutterstock

This next DIY is an easy way to give your kids a tent that you can bring outside for shade, or even hang inside of their bedroom. Some people also use this technique as a canopy above their child’s bed. There are a few different techniques and materials people use to make this, but it generally consists of a long piece of fabric, a hula hoop, rope, hooks, and hot glue. For a full tutorial on how to make this in just one hour, check out the instructions on the Making Lemonade Blog.

A little girl painting leaves and pinecones to press into paper. Credit: Shutterstock

12. Leaf Print Art

One of the most classic art projects that you may remember from your elementary school days is leaf print art. This is an amazing craft to do in the fall. When the leaves are falling from the trees, gather some of the prettiest ones with your kids. Next, use a paint brush to apply paint to one side of the leaf. Press the leaf down onto a piece of paper, and you’re done! If you already have paper and paint at home, this could potentially be completely free for you to do. Otherwise, all of the supplies are available from Dollar Tree.

This is what leaf art looks like when it’s done. Credit: Shutterstock

This craft can also be done in the spring and summer using green leaves that have not changed yet. Alternate with green paint in the warmer months, and do the same craft again in the fall with red and yellow paint. Hold onto that artwork, and show your kids and compare the two pieces of artwork. Even though this project is usually aimed towards elementary school students, kids of any age would still enjoy it. This could be a great craft to do with all of your kids who are currently homeschooled, no matter what grade they are in.

This little boy has a rocket ship made by his dad. Credit: Shutterstock

11. Make a Cardboard House or Rocket Ship

One of the most wonderful things about being a child is that your imagination is so vivid. Kids love to play pretend. Dressing up, games, and pretending to play various roles are apart of how kids have grown up since the beginning of time. You don’t always need to buy them an expensive toy for them to have fun. Sometimes, all they need is a cardboard box. If you’re receiving a lot of online deliveries, you most likely have a lot of cardboard boxes lying around the house already, so this could potentially be free material.

This boy has everything he needs to become a cardboard clad knight. Credit: Shutterstock

Before you get started, show your kids some inspiration photos on Pinterest and ask what they would like. Once you browse some tutorials, you should have a good idea on how to make it yourself. Next, use scissors to cut out the shape of the structure. Tape and permanent markers are your friends. Bring the pieces together, and voila- you have a magical cardboard house. If you have older children, this could be a great project to do together with them to make a house for their younger siblings. Kids might also want to help with painting or decorating the cardboard.

Create a cone, and glue pieces of shell pasta. Credit: Shutterstock

10. Macaroni Christmas Tree

If you have children, chances are that you’ve already done macaroni art with them before. This is a very popular project to do in elementary school, so you’ve probably had macaroni pieces hanging on your fridge at least once before. If you’re looking for something to do while homeschooling, this is always a cheap and easy option. There are also dozens of examples of macaroni art to find on Pinterest. But this isn’t limited to just pictures. You can make 3D artwork out of macaroni too.

Spray paint the tree once it is complete. Credit: Shutterstock

With current events, a lot of people stocked up on canned and dry goods. If you already have boxes of pasta in your kitchen cabinet, you might as well use them for this holiday DIY in the month of December. Take a cardboard toilet paper roll and transform it into a cone, or buy a styrofoam cone from the craft store. Once you have a stable cone shape, you can use hot glue to attach pieces of dry shell pasta, with a piece of bow tie pasta on top. Once it’s all done, spray paint the tree in green, gold, or silver.

This toddler is the cutest monster I’ve ever seen. Credit: Shutterstock

9. Make a Cardboard Box Costume Helmet

If you order a lot of things from Amazon Prime, your house is probably filled with boxes of all shapes and sizes on a regular basis. The next time you find a box that is roughly the size of your child’s head, set it to the side. This can be transformed into a costume helmet. Choose a character that your child resonates with. In the example shown in the photos, we have a child who looks like an astronaut, and another who looks like a monster.

This astronaut helmet was made of cardboard and permanent marker. Credit: Shutterstock

With some paint, markers, and construction paper, you can transform a cardboard box into almost anything. As a parent, you could try to make something out of the cardboard box for them so that it looks as I hear it as possible. Or, you could give your kids freedom to decorate these boxes whichever way they want. This is a much easier way to play dress up. And if you do this around Halloween, your kids might even want to wear this on the holiday while they trick-or-treat or watch scary movies.

Origami is the Japanese art of folding paper. Credit: Shutterstock

8. Origami Animals

Origami is the ancient Japanese art of folding paper to create shapes. All you need are pieces of paper that have been cut into perfect squares. There is no glue or anything else involved to make origami. So this is one of the cheapest crafts you can make from home. Follow YouTube tutorials online or find an instruction book to learn how to fold the paper in a certain pattern. This will create an infinite number of different shapes. As time goes on, it’s possible to create more complex origami. If you buy a stack of square origami paper from the craft store, it will provide multiple hours of fun. Some of the packs online even come with animal print patterns, which makes it easy to create lions and tigers.

The leopard and tiger print paper help bring these animals to life. Credit: Shutterstock

If you’re teaching origami to kids, it’s a great idea to make animal shapes. One of the easiest shapes for kids to create is the face of a dog or cat, using a market to draw the eyes and whiskers. A more advanced animal is the crane, which is one of the most popular shapes seen in origami. According to Japanese legend, if you fold 1,000 paper cranes, your wish will be granted by the gods. People will gather these 1,000 cranes on a string, and carry it to the temple to pray. Normally, this wish is usually done on behalf of others, like when a loved one is seriously ill, and they wish for them to get well.

You can make colorful necklaces out of wooden beads. Credit: Shutterstock

7. Wooden Bead Garland

Over the past couple years, wooden beads have come back in style. They are used for garland, bracelets, and necklaces. Stores like Pottery Barn want to charge upwards of $80 for a strand of beads. But believe it or not, you can find wooden beads at the Dollar Tree and make a DIY version of almost anything you find in the store. Even if you can’t find the exact color you are looking for, it’s easy enough to paint beads.

Neutral wooden bead garland has become popular recently. Credit: Shutterstock

Some examples of what you can make are garland on Christmas trees painted in red and green. Another great use for wooden beads are strands of wooden beads used as decor sitting on top of your dresser or coffee table. Then, of course, you could find wooden beads of all shapes and sizes to create a chunky necklace. This is a very cheap and fun craft that should be easy to make as an adult, or with kids.

Making a ghost out of yarn is easy. Credit: Shutterstock

6. Thread Ghosts for Halloween

When you go to the store, you might choose to buy something purely because it has tassels on it. Believe it or not, making tassels at home is actually very easy. All you need is a ball of yarn, a piece of cardboard, and a pair of scissors to get started. Wrap the yarn around the piece of cardboard over and over again, until you have the thickness you desire. Use a piece of yarn to tie the bunch together, and cut off the tassel. For a full tutorial on how to make tassels, check out this blog post from HGTV here.

Add eyes to create these cute ghosts. Credit: Shutterstock

Tassels are fun to make on their own, and can be attached to a blanket or pillow. (Check out our Ikea Hack list to see an example of how you can add tassels to a blanket to make it look like an Anthropologie knockoff.) But if you’re trying to make a craft with your kids, you can use these yarn tassels and turn them into little ghosts. This is perfect for Halloween, and your kids can hang these around the house as decorations. The same concept could be applied to Christmas, with a Santa tassel having a long white beard.

This toddler is creating a caterpillar out of bottle caps. Credit: Shutterstock

5. Bottle Cap Critters

For the sake of sustainability, we should try to create as little waste as possible. By creating less trash, we can help save the planet. So if you’re thinking about doing DIY projects, it’s always a good idea to try to recycle items that you already used and turn them into crafts. If you drink 2 liter bottles of soda on a regular basis, start collecting the caps in a jar instead of throwing them away. After collecting them for a few weeks, they can be transformed into great crafts for kids.

This toddler is using bottle caps to learn how to count. Credit: Shutterstock

For example, the bottle caps in the image above have been transformed into a caterpillar. This is a great craft to do with a toddler who is around 2 to 3 years old. In the second example, you can see how they glued bottle caps onto a piece of construction paper and used pom-poms to help with counting. There are a number of variations that can be done with this, especially if you have bottle caps in multiple colors. When you’re done with this craft, you can always recycle everything instead of throwing it away.

This helps teach toddlers motor skills with tongs or chop sticks. Credit: Shutterstock

4. The Motor Skills Turtle

Toddlers under the age of 3 can’t do complicated crafts, because they are still developing their motor skills. There are very few crafts that they can handle making with you, but you can still create DIY projects that they will absolutely love. This next craft is designed specifically for helping toddlers use their hands. improve motor skills, and learn about organization. If you’re keeping your kids home instead of sending them to preschool, this is a great activity to create your own, and then play together with them.

Drop the pom poms into the turtle’s back. Credit: Shutterstock

All you need are paper towels or toilet paper rolls, cardboard, construction paper, and small pom poms. These items are all available from your local dollar store, or it might be something that you already have in your crafting supplies. Trace out the shape of a turtle on construction paper, and glue it down to cardboard base. The cut paper towel or toilet rolls help to create little cups on the back of the turtle’s shell. Now, your kids can drop pom-poms into the holes. Challenge them to place one of each color into each hole, or organize the pom-poms by color.

Masks are easy to make with glitter paper, cardboard, ribbons, and beads. Credit: Shutterstock

3. Mardi Gras Mask

If you celebrate Mardi Gras, consider making some of these carnival masks. All you need are cardboard, colorful paper, ribbons, and beads. Glue the pieces together, and you have some cute masks ready to celebrate at home. New Orleans is famous for their Mardi Gras parade, where people wear strands of purple, gold, and green beads. Obviously, we can’t go to a crowded parade any time soon. The color purple represents justice, green for faith, and gold for power.

Completed Mardi Gras masks. Credit: Shutterstock

In case you didn’t know, Mardi Gras, or “Fat Tuesday”, is a holiday that is also known as Three Kings Day. This is the day before the Catholic tradition of Ash Wednesday, which begins fasting during a period called Lent. On Easter, everyone is allowed to break the fast. But since a lot of people abstain from alcohol, sugar, or fatty foods during the month of Lent, Mardi Gras meant to be a celebration for people embracing everything sinful before they take several weeks off. That’s why it’s full of eating fattening foods and indulging in physical pleasure.

These monsters are made with toilet roll, construction paper, and paint. Credit: Shutterstock

2. Toilet Roll Characters

Most people in the world hoarded toilet paper last year. If you’re one of them, you may want to start saving the toilet rolls once they are done. These cardboard rolls can be recycled and turned into cute toys for your kids. The greatest benefit of this one-hour craft is that it could potentially be free for you to make when you use art supplies you already have at home. Decorate the characters with googly eyes, markers, glitter, stamps, or whatever you already have in your supply closet.

These wacky characters all have a unique personality. Credit: Shutterstock

Encourage your children to paint the toilet paper rolls to look like any character they want. Your kids will feel like they received a new toy without spending any money. In the example shown in the photos, people used both construction paper and paint to create monsters. However, you could create any character you want. Check out Pinterest for ideas on making characters for any holiday or occasion. Some parents have helped their kids make entire towns out of toilet paper rolls. Once they get tired of using these crafts as toys, disposing of them is as simple as putting it in the recycling bin.

Felt wallets are a great gift to give your child. Credit: Shutterstock

1. Child’s Felt Wallet

When your kids are very young, it’s not likely that you are going to give them their own wallet. It’s too easy for them to accidentally lose it when they go to the store. However, as they get older, it might be good to get them used to carrying a wallet like a grown up. This next DIY is a very simple craft in making a wallet out of felt. All you need is a piece of colored felt, thread, and a button. Some free patterns online also make felt wallets a bit more complex, using hot glue to add pockets.

A felt wallet could be a girl’s first sewing project. Credit: Shutterstock

If you grew up learning how to sew, you probably want to pass down that skill to your own children. Once your kids are around the age of eight or nine, they should be able to handle making one of these wallets on their own, with adult supervision. This could be a great project for you to introduce hand sewing to your kids so that they get used to the process. Since this is so quick and easy to make, it is instant gratification that will make them feel proud of making something.

Advertisement